How to Preserve Your Tomato Harvest: A Step-by-Step Guide to Canning Tomatoes

tomatoes
1
Welcome to Outdoors and Country Living! Today, we're diving into one of the most rewarding parts of gardening: preserving your tomato harvest. Despite the dark and rainy start to the day, the weather cleared up enough for me to gather a bushel and a half of fresh tomatoes. Now, I'm excited to show you how we can tomatoes at our place. While it might seem time-consuming due to the multiple steps involved, the process is quite simple and well worth the effort. Follow along as I guide you through each step in my country kitchen.
Preparing Your Tomatoes
Washing and Coring: Start by removing the stems and giving the tomatoes a good wash, especially if they're muddy from rain. Use a paring knife to remove the stem area by cutting around it in a circle. Place the cored tomatoes in containers for the next step.
Blanching: Heat a large pot of water until it's hot but not boiling. Blanch the tomatoes in this water for 30-60 seconds, or until the skins start to crack. This makes peeling them much easier. Immediately transfer the blanched tomatoes into a sink filled with cold water to stop the cooking process.
Peeling: Once the tomatoes have cooled, peel off the skins, which should come off easily. Place the peeled tomatoes in a stockpot for now.
Chopping and Jarring
Chopping: Quarter the tomatoes, or cut them into smaller pieces if they're large. Doing this over a sink helps manage the mess. Place the chopped tomatoes in another stockpot.

2
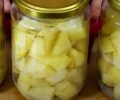
Filling Jars: Fill your jars with the chopped tomatoes, packing them down to remove air pockets. A table knife works well for this. Leave some space at the top of each jar.

3
Adding Lemon Juice: Add a tablespoon of lemon juice to each jar to ensure the acidity is high enough for safe canning. You can add salt if you prefer, but it's optional.

4
Cleaning and Sealing: Wipe the rims of the jars to ensure they're clean, then place the lids and rings on the jars, tightening them just finger-tight.

5
Processing
Water Bath Canning: Place the jars in a water bath canner, ensuring they're covered by 1-2 inches of water. Since the jars and tomatoes are cold, use cool to slightly warm water to avoid breaking the jars. Once the water reaches a rolling boil, process the jars for 45 minutes.
Cooling and Storing: After processing, let the jars sit in the canner for a few minutes before lifting them out. Allow them to cool completely on a towel-covered surface. Once cooled, check the seals, label the jars, and store them in a cool, dark place.

6
Final Thoughts
Preserving tomatoes is a fantastic way to enjoy your garden's bounty throughout the year. Home-canned tomatoes are perfect for making soups, chili, and sauces during the fall and winter months. Each step in this process ensures your tomatoes are safely preserved and delicious.
Happy canning

Ingredients
tomatoes
Directions
1
Welcome to Outdoors and Country Living! Today, we're diving into one of the most rewarding parts of gardening: preserving your tomato harvest. Despite the dark and rainy start to the day, the weather cleared up enough for me to gather a bushel and a half of fresh tomatoes. Now, I'm excited to show you how we can tomatoes at our place. While it might seem time-consuming due to the multiple steps involved, the process is quite simple and well worth the effort. Follow along as I guide you through each step in my country kitchen.
Preparing Your Tomatoes
Washing and Coring: Start by removing the stems and giving the tomatoes a good wash, especially if they're muddy from rain. Use a paring knife to remove the stem area by cutting around it in a circle. Place the cored tomatoes in containers for the next step.
Blanching: Heat a large pot of water until it's hot but not boiling. Blanch the tomatoes in this water for 30-60 seconds, or until the skins start to crack. This makes peeling them much easier. Immediately transfer the blanched tomatoes into a sink filled with cold water to stop the cooking process.
Peeling: Once the tomatoes have cooled, peel off the skins, which should come off easily. Place the peeled tomatoes in a stockpot for now.
Chopping and Jarring
Chopping: Quarter the tomatoes, or cut them into smaller pieces if they're large. Doing this over a sink helps manage the mess. Place the chopped tomatoes in another stockpot.
2
Filling Jars: Fill your jars with the chopped tomatoes, packing them down to remove air pockets. A table knife works well for this. Leave some space at the top of each jar.
3
Adding Lemon Juice: Add a tablespoon of lemon juice to each jar to ensure the acidity is high enough for safe canning. You can add salt if you prefer, but it's optional.
4
Cleaning and Sealing: Wipe the rims of the jars to ensure they're clean, then place the lids and rings on the jars, tightening them just finger-tight.
5
Processing
Water Bath Canning: Place the jars in a water bath canner, ensuring they're covered by 1-2 inches of water. Since the jars and tomatoes are cold, use cool to slightly warm water to avoid breaking the jars. Once the water reaches a rolling boil, process the jars for 45 minutes.
Cooling and Storing: After processing, let the jars sit in the canner for a few minutes before lifting them out. Allow them to cool completely on a towel-covered surface. Once cooled, check the seals, label the jars, and store them in a cool, dark place.
6
Final Thoughts
Preserving tomatoes is a fantastic way to enjoy your garden's bounty throughout the year. Home-canned tomatoes are perfect for making soups, chili, and sauces during the fall and winter months. Each step in this process ensures your tomatoes are safely preserved and delicious.
Happy canning
Leave a Review
Please log in or register for a new account in order to leave a review.