How to Make Peach Jam: A Simple Guide

peaches
1
Hello everyone! Welcome to Semi-Homesteading with Abby. Today, we're making peach jam, and I’m thrilled to share this recipe with you. Living in Colorado, we eagerly await the ripening of Palisade peaches each year, and it’s finally peach season! I recently received a full case of these delicious peaches, and after making peach-raspberry pies and peach popsicles, it's time to preserve the rest by making jam. Let’s get started!
Supplies Needed for Peach Jam
Peaches (8 for a double batch)
Sugar
Lemon Juice
Butter (optional, for reducing foam)
Large Pot
Blender or Food Processor
Canning Jars with Lids and Rings
Canning Funnel
Spoon or Spatula
Step-by-Step Instructions
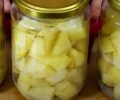
Wash and Prepare the Peaches:
Thoroughly wash the peaches to remove any fuzz.
Remove any soft spots.
Quarter the peaches, leaving the skin on for extra pectin, which helps the jam set.
Puree the Peaches:

2
Use a blender or food processor to puree the peaches until smooth. Keeping the skins on adds fiber and natural pectin, which helps the jam thicken.
Cook the Peach Puree:

3
Transfer the puree to a heavy pot.
Add 4 tablespoons of lemon juice and 4 cups of sugar for a double batch (adjust to taste).
Stir the mixture and bring it to a boil over medium-high heat.
Reduce Foam (Optional):
If foam forms on the surface, add a pat or two of butter to reduce it. This trick helps achieve a clearer jam.
Simmer the Jam:
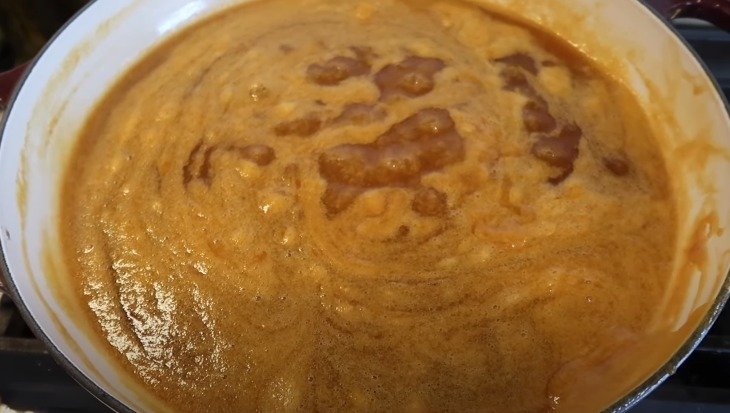
4
Once boiling, reduce the heat to a simmer and cook for 15-20 minutes.
Stir occasionally and monitor the consistency. You can simmer longer for a thicker jam or shorter for a runnier consistency. The jam should coat the back of a spoon when it’s ready.
Prepare the Jars:
While the jam is simmering, clean your canning jars.
Keep them warm to prevent cracking when you add the hot jam.
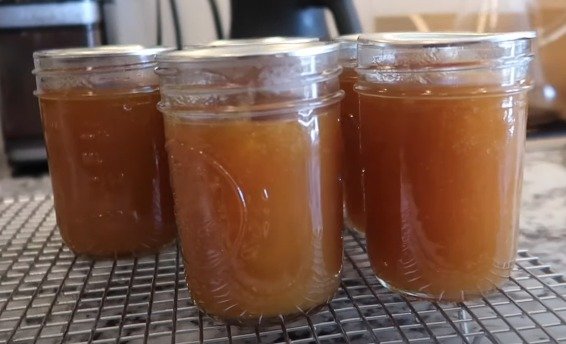
Fill the Jars:
Use a canning funnel to ladle the hot jam into the jars, leaving about 1/4 inch of headspace at the top.
Wipe the rims clean to ensure a good seal.
Place the lids on the jars and screw on the rings until they are fingertip-tight.
Cool and Store the Jars:
Allow the jars to cool to room temperature.
If you plan to store the jam long-term, you can process the jars in a water bath canner for 10 minutes to ensure they are properly sealed.
Enjoy Your Jam:
Once cooled, the jam is ready to enjoy. Try it on toast with almond butter for a delicious treat. The jam will firm up more once it’s fully cooled.
Additional Tips
Adjust Sugar to Taste: Start with less sugar and add more as needed based on your taste preference.
Monitor Consistency: If you prefer a thicker jam, simmer it longer. For a runnier jam, reduce the simmering time.
Canning for Long-Term Storage: If you want to store the jam for an extended period, follow proper water bath canning procedures to ensure a safe seal.
Peach jam is a wonderful way to preserve the fresh taste of summer peaches. It’s perfect for spreading on toast, adding to desserts, or giving as gifts. Happy canning
Ingredients
peaches
Directions
1
Hello everyone! Welcome to Semi-Homesteading with Abby. Today, we're making peach jam, and I’m thrilled to share this recipe with you. Living in Colorado, we eagerly await the ripening of Palisade peaches each year, and it’s finally peach season! I recently received a full case of these delicious peaches, and after making peach-raspberry pies and peach popsicles, it's time to preserve the rest by making jam. Let’s get started!
Supplies Needed for Peach Jam
Peaches (8 for a double batch)
Sugar
Lemon Juice
Butter (optional, for reducing foam)
Large Pot
Blender or Food Processor
Canning Jars with Lids and Rings
Canning Funnel
Spoon or Spatula
Step-by-Step Instructions
Wash and Prepare the Peaches:
Thoroughly wash the peaches to remove any fuzz.
Remove any soft spots.
Quarter the peaches, leaving the skin on for extra pectin, which helps the jam set.
Puree the Peaches:
2
Use a blender or food processor to puree the peaches until smooth. Keeping the skins on adds fiber and natural pectin, which helps the jam thicken.
Cook the Peach Puree:
3
Transfer the puree to a heavy pot.
Add 4 tablespoons of lemon juice and 4 cups of sugar for a double batch (adjust to taste).
Stir the mixture and bring it to a boil over medium-high heat.
Reduce Foam (Optional):
If foam forms on the surface, add a pat or two of butter to reduce it. This trick helps achieve a clearer jam.
Simmer the Jam:
4
Once boiling, reduce the heat to a simmer and cook for 15-20 minutes.
Stir occasionally and monitor the consistency. You can simmer longer for a thicker jam or shorter for a runnier consistency. The jam should coat the back of a spoon when it’s ready.
Prepare the Jars:
While the jam is simmering, clean your canning jars.
Keep them warm to prevent cracking when you add the hot jam.
Fill the Jars:
Use a canning funnel to ladle the hot jam into the jars, leaving about 1/4 inch of headspace at the top.
Wipe the rims clean to ensure a good seal.
Place the lids on the jars and screw on the rings until they are fingertip-tight.
Cool and Store the Jars:
Allow the jars to cool to room temperature.
If you plan to store the jam long-term, you can process the jars in a water bath canner for 10 minutes to ensure they are properly sealed.
Enjoy Your Jam:
Once cooled, the jam is ready to enjoy. Try it on toast with almond butter for a delicious treat. The jam will firm up more once it’s fully cooled.
Additional Tips
Adjust Sugar to Taste: Start with less sugar and add more as needed based on your taste preference.
Monitor Consistency: If you prefer a thicker jam, simmer it longer. For a runnier jam, reduce the simmering time.
Canning for Long-Term Storage: If you want to store the jam for an extended period, follow proper water bath canning procedures to ensure a safe seal.
Peach jam is a wonderful way to preserve the fresh taste of summer peaches. It’s perfect for spreading on toast, adding to desserts, or giving as gifts. Happy canning
Leave a Review
Please log in or register for a new account in order to leave a review.