How to Can Peaches: Preserve Fresh Peaches All Year Long

fresh peaches
sugar
1
Do you love fresh peaches and wish their season would last longer? I have great news for you! You can preserve those juicy peaches to enjoy all year round. Today, I'll show you just how easy it is with a detailed, step-by-step guide to canning your peaches from start to finish. Peaches were the first fruit I ever canned, and the process was so simple it gave me the confidence to try canning other foods. This guide is perfect for beginners, so let's get started!
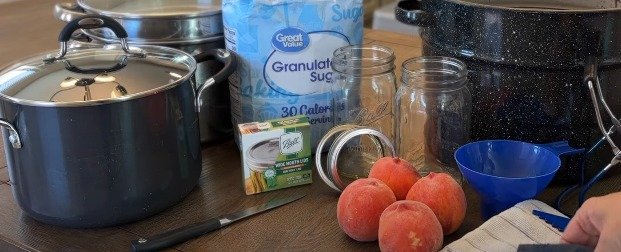
Supplies You Will Need:
Fresh peaches
Sugar
Canning jars with lids and rings
Water bath canner with a basket insert
Two large pots
Paring knife
Wide funnel
Slim spatula or a similar tool
Jar lifter
Clean, damp cloth
Towels
Step-by-Step Guide to Canning Peaches
Preparing Your Supplies
Sterilize Your Jars: Load your canning jars into the dishwasher on a sanitize cycle. If you don't have a dishwasher, wash them in hot, soapy water and rinse well.

2
Prepare Ice Water Bath: Fill your sink or a large bowl with ice-cold water to stop the peaches from cooking after blanching.

3
Set Up Your Canner: Fill your water bath canner with water about 2/3 to 3/4 full and place it on the stovetop.
Boil Water: Fill one large pot with water for blanching peaches and bring it to a boil.
Prepare Syrup: In another pot, make your syrup by boiling water and sugar. I prefer a light syrup made with 4 cups of water and 1 cup of sugar. Adjust the syrup's sweetness to your preference.

4
Choosing and Preparing Peaches
Picking Peaches: Choose freestone peaches as the pits are easier to remove. Pick slightly soft peaches with a little give when pressed.
Handling Peaches: Once you bring them home, lay the peaches in a single layer to avoid bruising. If they are hard, let them sit on the counter for a day or two to ripen.
Blanching and Peeling
Blanch the Peaches: Dip peaches in boiling water for about 30 seconds, then plunge them into the ice water bath.

5
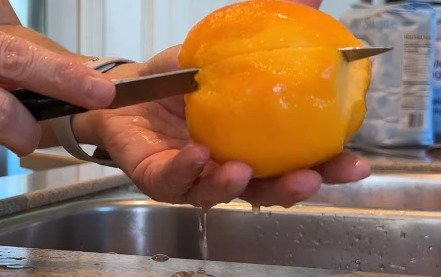
Peel the Peaches: The skin should slip off easily. Use a paring knife or your fingers to peel the skin.
Pit and Slice: Cut around the peach's natural line, twist to open, and remove the pit. Slice the peaches as desired.
Filling the Jars
Fill with Peaches: Grab a hot jar from the dishwasher and fill it with peach slices, cavity side inwards for better packing.
Add Lemon Juice: Sprinkle 1-2 tablespoons of bottled lemon juice or a commercial product like Fruit Fresh to maintain color and freshness.

6
Pour Syrup: Using a wide funnel, pour hot syrup over the peaches, leaving a half-inch headspace. Use a slim spatula to remove air bubbles and top off with more syrup if needed.
Clean the Rim: Wipe the rim of the jar with a clean, damp cloth to ensure a good seal.
Seal the Jar: Place the lid on the jar and screw on the ring until it's fingertip tight.
Processing the Jars
Place in Canner: Place jars in the canner basket and lower them into the canner. Ensure the water covers the jars by 1-2 inches.

7
Boil and Process: Bring the water to a boil, then process quart jars for 25 minutes and pint jars for 20 minutes.
Cool the Jars: Turn off the heat, lift the basket, and let the jars sit for 5 minutes before removing. Place jars on a towel and let them cool completely without moving.
Final Steps
Check Seals: Once cooled, check the lids for a proper seal by pressing the center. If it doesn't move, the jar is sealed. If it pops, refrigerate and use within a few days.
Clean Jars: Wash jars and rings in hot, soapy water to remove any sticky residue.

8
Store: Label the jars and store them in a cool, dark place. While peaches are best consumed within a year, they can last longer with slight quality degradation.
Tips for Successful Peach Canning
Freestone vs. Clingstone: Always opt for freestone peaches for easier pitting.
Sweetness: Adjust the syrup to your taste; peaches naturally have a lot of sweetness.
Jar Handling: Use wide-mouth jars for easier packing and handling.
Air Bubbles: Removing air bubbles is crucial to prevent spoilage.
By following these steps, you can enjoy delicious, fresh-tasting peaches all year long. Try canning your own peaches and share your experience in the comments below. Happy canning!

Ingredients
fresh peaches
sugar
Directions
1
Do you love fresh peaches and wish their season would last longer? I have great news for you! You can preserve those juicy peaches to enjoy all year round. Today, I'll show you just how easy it is with a detailed, step-by-step guide to canning your peaches from start to finish. Peaches were the first fruit I ever canned, and the process was so simple it gave me the confidence to try canning other foods. This guide is perfect for beginners, so let's get started!
Supplies You Will Need:
Fresh peaches
Sugar
Canning jars with lids and rings
Water bath canner with a basket insert
Two large pots
Paring knife
Wide funnel
Slim spatula or a similar tool
Jar lifter
Clean, damp cloth
Towels
Step-by-Step Guide to Canning Peaches
Preparing Your Supplies
Sterilize Your Jars: Load your canning jars into the dishwasher on a sanitize cycle. If you don't have a dishwasher, wash them in hot, soapy water and rinse well.

2
Prepare Ice Water Bath: Fill your sink or a large bowl with ice-cold water to stop the peaches from cooking after blanching.

3
Set Up Your Canner: Fill your water bath canner with water about 2/3 to 3/4 full and place it on the stovetop.
Boil Water: Fill one large pot with water for blanching peaches and bring it to a boil.
Prepare Syrup: In another pot, make your syrup by boiling water and sugar. I prefer a light syrup made with 4 cups of water and 1 cup of sugar. Adjust the syrup's sweetness to your preference.

4
Choosing and Preparing Peaches
Picking Peaches: Choose freestone peaches as the pits are easier to remove. Pick slightly soft peaches with a little give when pressed.
Handling Peaches: Once you bring them home, lay the peaches in a single layer to avoid bruising. If they are hard, let them sit on the counter for a day or two to ripen.
Blanching and Peeling
Blanch the Peaches: Dip peaches in boiling water for about 30 seconds, then plunge them into the ice water bath.

5
Peel the Peaches: The skin should slip off easily. Use a paring knife or your fingers to peel the skin.
Pit and Slice: Cut around the peach's natural line, twist to open, and remove the pit. Slice the peaches as desired.
Filling the Jars
Fill with Peaches: Grab a hot jar from the dishwasher and fill it with peach slices, cavity side inwards for better packing.
Add Lemon Juice: Sprinkle 1-2 tablespoons of bottled lemon juice or a commercial product like Fruit Fresh to maintain color and freshness.

6
Pour Syrup: Using a wide funnel, pour hot syrup over the peaches, leaving a half-inch headspace. Use a slim spatula to remove air bubbles and top off with more syrup if needed.
Clean the Rim: Wipe the rim of the jar with a clean, damp cloth to ensure a good seal.
Seal the Jar: Place the lid on the jar and screw on the ring until it's fingertip tight.
Processing the Jars
Place in Canner: Place jars in the canner basket and lower them into the canner. Ensure the water covers the jars by 1-2 inches.

7
Boil and Process: Bring the water to a boil, then process quart jars for 25 minutes and pint jars for 20 minutes.
Cool the Jars: Turn off the heat, lift the basket, and let the jars sit for 5 minutes before removing. Place jars on a towel and let them cool completely without moving.
Final Steps
Check Seals: Once cooled, check the lids for a proper seal by pressing the center. If it doesn't move, the jar is sealed. If it pops, refrigerate and use within a few days.
Clean Jars: Wash jars and rings in hot, soapy water to remove any sticky residue.

8
Store: Label the jars and store them in a cool, dark place. While peaches are best consumed within a year, they can last longer with slight quality degradation.
Tips for Successful Peach Canning
Freestone vs. Clingstone: Always opt for freestone peaches for easier pitting.
Sweetness: Adjust the syrup to your taste; peaches naturally have a lot of sweetness.
Jar Handling: Use wide-mouth jars for easier packing and handling.
Air Bubbles: Removing air bubbles is crucial to prevent spoilage.
By following these steps, you can enjoy delicious, fresh-tasting peaches all year long. Try canning your own peaches and share your experience in the comments below. Happy canning!

Leave a Review
Please log in or register for a new account in order to leave a review.


