How to Dehydrate and Can Bananas: A Step-by-Step Guide

bananas
1 tbsp lemon juice
1
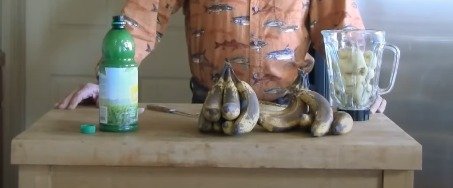
Welcome to Prairie Fox Survival! I'm Richard, and today I’m excited to share a fantastic way to preserve bananas, a versatile and nutritious fruit. Recently, I took advantage of a great Thanksgiving sale, where bananas were just 22 cents a pound. I bought about 20 pounds and experimented with dehydrating and canning them.
Dehydrating Bananas
Dehydrating bananas is a great way to extend their shelf life and create a convenient snack. Here’s how I did it:
Peel and Slice: Peel the bananas and slice them into even pieces.
Dehydrate: Place the banana slices in a dehydrator or a low-temperature oven. Make sure the pieces are evenly spaced for consistent drying.
Store: Once fully dehydrated, store the bananas in airtight containers to keep them fresh.
Canning Bananas
Canning is another excellent method to preserve bananas. Here’s a step-by-step process:
Preparation: Let the bananas ripen fully. Peel them and cut them into chunks.
2
Puree: Place the banana chunks into a blender and puree them. This will be the base for various recipes like banana nut bread and banana nut cookies.

3
Citric Acid Addition: Add a tablespoon of lemon juice to the puree. This acts as a preservative.
Sterilize Jars: Boil the canning jars to sterilize them. You can also use the sterilization cycle on a dishwasher.
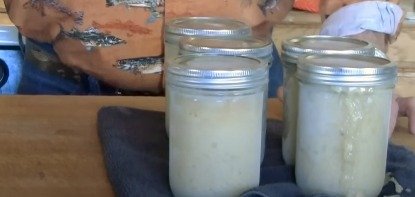
Fill Jars: Pour the banana puree into the jars, leaving about 1/4 inch of space at the top. Make sure the jars are clean before sealing them.
Water Bath: Place the jars in a pot of boiling water, ensuring they are fully submerged. Boil for 12 minutes to process.

4
Cool and Store: Let the jars cool. Once sealed, they can be stored for up to a year or more. You may notice some discoloration or liquid separation over time, but this is normal and safe.

5
Tips and Tricks
Handling Hot Jars: Use tools like jar lifters or heat-resistant gloves to handle hot jars. Safety first!

6
Boiling Water: Ensure your jars are fully submerged with about an inch of water above them. If a jar floats, place a weight on top to keep it submerged.

7
Checking Seals: After the jars cool, check the seals. If any jars didn’t seal properly, refrigerate and use them soon

8
.Practical Uses
Canned bananas are incredibly versatile. Each pint jar contains two cups of puree, perfect for making a loaf of banana nut bread. They are also a great addition to your survival kit. A sealed jar of banana puree can serve as both food and a makeshift bobber for fishing.

9
Final Thoughts
Thank you for joining us at Prairie Fox Survival. Whether you're a survival enthusiast or just looking to make the most of a banana sale, these methods will help you preserve your food efficiently. Stay tuned for more tips and tricks on sustainable living and food preservation. See you next time!


Ingredients
bananas
1 tbsp lemon juice
Directions
1
Welcome to Prairie Fox Survival! I'm Richard, and today I’m excited to share a fantastic way to preserve bananas, a versatile and nutritious fruit. Recently, I took advantage of a great Thanksgiving sale, where bananas were just 22 cents a pound. I bought about 20 pounds and experimented with dehydrating and canning them.
Dehydrating Bananas
Dehydrating bananas is a great way to extend their shelf life and create a convenient snack. Here’s how I did it:
Peel and Slice: Peel the bananas and slice them into even pieces.
Dehydrate: Place the banana slices in a dehydrator or a low-temperature oven. Make sure the pieces are evenly spaced for consistent drying.
Store: Once fully dehydrated, store the bananas in airtight containers to keep them fresh.
Canning Bananas
Canning is another excellent method to preserve bananas. Here’s a step-by-step process:
Preparation: Let the bananas ripen fully. Peel them and cut them into chunks.
2
Puree: Place the banana chunks into a blender and puree them. This will be the base for various recipes like banana nut bread and banana nut cookies.
3
Citric Acid Addition: Add a tablespoon of lemon juice to the puree. This acts as a preservative.
Sterilize Jars: Boil the canning jars to sterilize them. You can also use the sterilization cycle on a dishwasher.
Fill Jars: Pour the banana puree into the jars, leaving about 1/4 inch of space at the top. Make sure the jars are clean before sealing them.
Water Bath: Place the jars in a pot of boiling water, ensuring they are fully submerged. Boil for 12 minutes to process.
4
Cool and Store: Let the jars cool. Once sealed, they can be stored for up to a year or more. You may notice some discoloration or liquid separation over time, but this is normal and safe.
5
Tips and Tricks
Handling Hot Jars: Use tools like jar lifters or heat-resistant gloves to handle hot jars. Safety first!
6
Boiling Water: Ensure your jars are fully submerged with about an inch of water above them. If a jar floats, place a weight on top to keep it submerged.
7
Checking Seals: After the jars cool, check the seals. If any jars didn’t seal properly, refrigerate and use them soon
8
.Practical Uses
Canned bananas are incredibly versatile. Each pint jar contains two cups of puree, perfect for making a loaf of banana nut bread. They are also a great addition to your survival kit. A sealed jar of banana puree can serve as both food and a makeshift bobber for fishing.
9
Final Thoughts
Thank you for joining us at Prairie Fox Survival. Whether you're a survival enthusiast or just looking to make the most of a banana sale, these methods will help you preserve your food efficiently. Stay tuned for more tips and tricks on sustainable living and food preservation. See you next time!
Leave a Review
Please log in or register for a new account in order to leave a review.