How to Can Onion Stock: A Step-by-Step Guide
1
Good morning, and welcome back to the Needy Homesteader channel! Today, we're diving into the art of canning onion stock, a flavorful base that enhances many dishes. If you missed how we made our onion stock two days ago, I'll leave a card above for easy reference.
2
Getting Started
First, let’s review the setup and tools you'll need for canning:
Electric Canner: I’ve been using my Ball electric canner, but you can use a slow cooker, Instant Pot, roasting pan, or a regular pot on the stove.
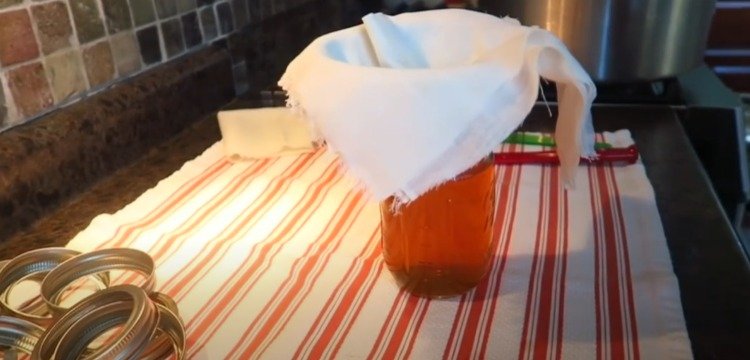
Straining Tools: I typically use the spigot of my canner, but today, I’ll show you a method suitable for various setups, including cheesecloth for straining.
Canning Essentials: Clean, hot lids, rings, canning funnel, cheesecloth, canning tongs, a canning scoop or ladle, and a measuring tool.
Preparing Your Workspace
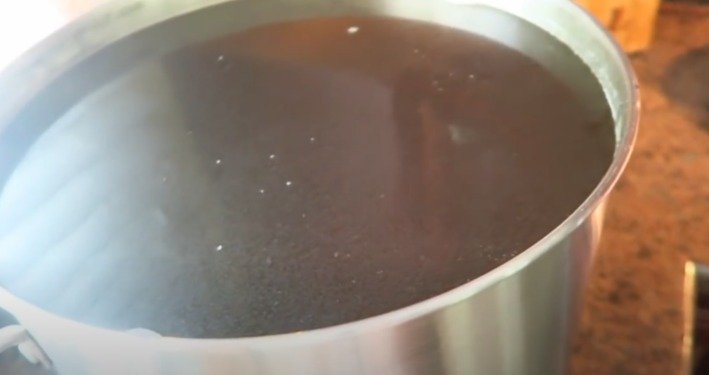
Stock Preparation: Turn your stock to medium heat in the morning.
3
Remove the large onion chunks and strain the stock into your canning jar using cheesecloth for a clear product.
Jars and Lids: Keep your clean lids in hot water to soften the sealing compound. Use a dishwasher to heat your jars, ensuring they remain hot for the canning process.
Canner Setup: Fill your canner with three inches of water, ensuring the jars will sit above the waterline.

4
Canning Process
Filling Jars: Using a double-layered cheesecloth in your funnel, scoop the hot stock into jars, leaving a one-inch headspace.
Wiping Rims and Sealing: Wipe the jar rims with vinegar to ensure a clean seal. Place the lids on and screw the rings fingertip-tight.
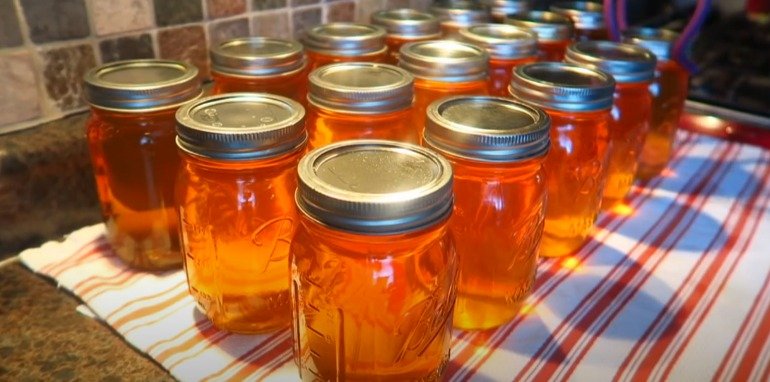
Loading the Canner: Carefully place the jars into your canner, following your manufacturer's instructions for your specific model. For pints, process for 30 minutes; for quarts, 35 minutes.
Post-Canning Steps
Cooling and Storing: Once the processing time is complete, let the canner depressurize naturally. Remove the jars and let them cool. Listen for the satisfying "pop" of the lids sealing.
Inspection: Check that the lids are sealed correctly. Any jars that didn't seal properly should be refrigerated and used within a few days.
Tips and Tricks
Consistency in Stock: The number of jars you get will vary depending on the batch size and ingredients used. Adjust your method as needed, adding vegetables like celery for more flavor if desired.
Using Your Stock: Use this onion stock as a base for soups, stews, and rice. Replace water with stock in recipes for added depth and flavor.
Conclusion
Canning your onion stock is a rewarding process that results in a pantry stocked with rich, flavorful jars ready to elevate your cooking. Remember, the more you practice, the easier it becomes.
Happy canning!

Ingredients
Directions
1
Good morning, and welcome back to the Needy Homesteader channel! Today, we're diving into the art of canning onion stock, a flavorful base that enhances many dishes. If you missed how we made our onion stock two days ago, I'll leave a card above for easy reference.
2
Getting Started
First, let’s review the setup and tools you'll need for canning:
Electric Canner: I’ve been using my Ball electric canner, but you can use a slow cooker, Instant Pot, roasting pan, or a regular pot on the stove.
Straining Tools: I typically use the spigot of my canner, but today, I’ll show you a method suitable for various setups, including cheesecloth for straining.
Canning Essentials: Clean, hot lids, rings, canning funnel, cheesecloth, canning tongs, a canning scoop or ladle, and a measuring tool.
Preparing Your Workspace
Stock Preparation: Turn your stock to medium heat in the morning.
3
Remove the large onion chunks and strain the stock into your canning jar using cheesecloth for a clear product.
Jars and Lids: Keep your clean lids in hot water to soften the sealing compound. Use a dishwasher to heat your jars, ensuring they remain hot for the canning process.
Canner Setup: Fill your canner with three inches of water, ensuring the jars will sit above the waterline.
4
Canning Process
Filling Jars: Using a double-layered cheesecloth in your funnel, scoop the hot stock into jars, leaving a one-inch headspace.
Wiping Rims and Sealing: Wipe the jar rims with vinegar to ensure a clean seal. Place the lids on and screw the rings fingertip-tight.
Loading the Canner: Carefully place the jars into your canner, following your manufacturer's instructions for your specific model. For pints, process for 30 minutes; for quarts, 35 minutes.
Post-Canning Steps
Cooling and Storing: Once the processing time is complete, let the canner depressurize naturally. Remove the jars and let them cool. Listen for the satisfying "pop" of the lids sealing.
Inspection: Check that the lids are sealed correctly. Any jars that didn't seal properly should be refrigerated and used within a few days.
Tips and Tricks
Consistency in Stock: The number of jars you get will vary depending on the batch size and ingredients used. Adjust your method as needed, adding vegetables like celery for more flavor if desired.
Using Your Stock: Use this onion stock as a base for soups, stews, and rice. Replace water with stock in recipes for added depth and flavor.
Conclusion
Canning your onion stock is a rewarding process that results in a pantry stocked with rich, flavorful jars ready to elevate your cooking. Remember, the more you practice, the easier it becomes.
Happy canning!
Leave a Review
Please log in or register for a new account in order to leave a review.