How to Pressure Can Hardboiled Eggs: A Step-by-Step Guide
eggs
1 tsp salt
1
How to Pressure Can Hardboiled Eggs: A Step-by-Step Guide
Welcome to Boots and BNY Homestead! My name is Casey, and today, we're diving into something a bit different from our usual content. If this is your first time here, welcome to the channel! Typically, we cover topics like sourdough, homesteading, gardening, canning, and cooking. However, today’s project is unique and might pique your interest: pressure canning whole eggs to create pantry-shelf-stable hardboiled eggs.
Why Pressure Can Hardboiled Eggs?
Being part of numerous Facebook groups about homesteading and canning, I've noticed many discussions about canning eggs. While water glassing is a common method, today, we’re focusing on pressure canning whole eggs. This method ensures that the eggs are shelf-stable, providing a convenient source of hardboiled eggs without refrigeration.

2
What You’ll Need
To start, gather the following supplies:
Quart-sized wide mouth jars (we’re using wide mouth to make egg retrieval easier)
Fresh or older eggs (a mixture works fine)
Water
Teaspoon of salt per jar
Pressure canner
Clean lids and rings
Step-by-Step Instructions
Prepare the Eggs:
Use the cleanest eggs available. We’re using smaller eggs from our Austorp chickens, which fit well into the quart jars.
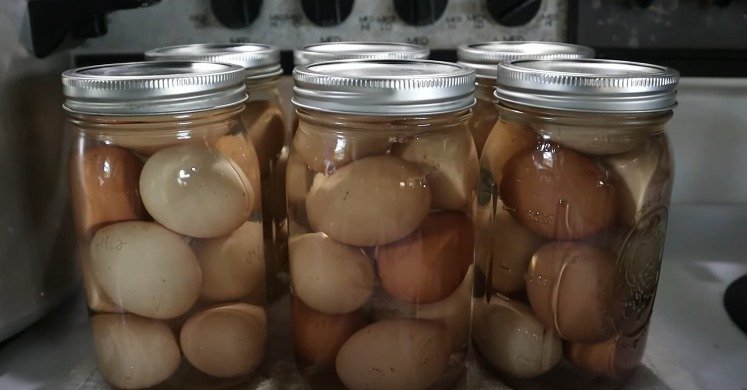
Fill the Jars:
Carefully place the eggs into the jars. Aim to fit as many as possible without overcrowding. We managed to fit about 10 eggs per jar.
Add Water and Salt:
Fill the jars with water, ensuring the eggs are fully submerged.
Add a teaspoon of salt to each jar.
Seal the Jars:
Apply the lids and rings, ensuring they are secure but not overly tight.
Pressure Canning:
Place the jars in the pressure canner and follow the manufacturer’s instructions for pressure canning eggs. Typically, you'll want to process at the appropriate pressure for your altitude.
After processing, allow the canner to cool naturally before opening it.
Post-Canning Inspection
After 24 hours, inspect the eggs:
Check for cracks: Some eggs may crack, but as long as the whites haven’t leaked out, they are fine.
Evaluate the yolks: The yolks should be firm, with the outer layer slightly green and the inside yellow.
Observe the whites: They might have a creamy tan color, similar to the eggshell.

3
Taste Test and Adjustments
The taste test revealed that the eggs didn’t absorb much salt, making them quite plain. This means we might reduce the salt next time or adjust the canning time. Experimentation is key to finding the perfect balance.
Uses and Shelf Life
Canned hardboiled eggs are versatile:
Quick Meals: Ideal for quick sandwiches, chicken salads, or tuna salads, especially when on the go or camping.
Prepper Pantry: Great for emergency food supplies, providing a reliable protein source.
While most people report eating their canned eggs within a year, they can last up to that long when stored properly.

4
Join the Discussion
Have you tried canning eggs? Share your experiences, tips, and questions in the comments below. We’re keen to learn from your trials and errors as we refine this process together. Stay tuned for follow-up updates and more exciting homesteading projects!
Thank you for stopping by Boots and BNY Homestead. If you have suggestions or want to see something specific, let us know. We’ll see you in the next video—happy canning!


Ingredients
eggs
1 tsp salt
Directions
1
How to Pressure Can Hardboiled Eggs: A Step-by-Step Guide
Welcome to Boots and BNY Homestead! My name is Casey, and today, we're diving into something a bit different from our usual content. If this is your first time here, welcome to the channel! Typically, we cover topics like sourdough, homesteading, gardening, canning, and cooking. However, today’s project is unique and might pique your interest: pressure canning whole eggs to create pantry-shelf-stable hardboiled eggs.
Why Pressure Can Hardboiled Eggs?
Being part of numerous Facebook groups about homesteading and canning, I've noticed many discussions about canning eggs. While water glassing is a common method, today, we’re focusing on pressure canning whole eggs. This method ensures that the eggs are shelf-stable, providing a convenient source of hardboiled eggs without refrigeration.
2
What You’ll Need
To start, gather the following supplies:
Quart-sized wide mouth jars (we’re using wide mouth to make egg retrieval easier)
Fresh or older eggs (a mixture works fine)
Water
Teaspoon of salt per jar
Pressure canner
Clean lids and rings
Step-by-Step Instructions
Prepare the Eggs:
Use the cleanest eggs available. We’re using smaller eggs from our Austorp chickens, which fit well into the quart jars.
Fill the Jars:
Carefully place the eggs into the jars. Aim to fit as many as possible without overcrowding. We managed to fit about 10 eggs per jar.
Add Water and Salt:
Fill the jars with water, ensuring the eggs are fully submerged.
Add a teaspoon of salt to each jar.
Seal the Jars:
Apply the lids and rings, ensuring they are secure but not overly tight.
Pressure Canning:
Place the jars in the pressure canner and follow the manufacturer’s instructions for pressure canning eggs. Typically, you'll want to process at the appropriate pressure for your altitude.
After processing, allow the canner to cool naturally before opening it.
Post-Canning Inspection
After 24 hours, inspect the eggs:
Check for cracks: Some eggs may crack, but as long as the whites haven’t leaked out, they are fine.
Evaluate the yolks: The yolks should be firm, with the outer layer slightly green and the inside yellow.
Observe the whites: They might have a creamy tan color, similar to the eggshell.
3
Taste Test and Adjustments
The taste test revealed that the eggs didn’t absorb much salt, making them quite plain. This means we might reduce the salt next time or adjust the canning time. Experimentation is key to finding the perfect balance.
Uses and Shelf Life
Canned hardboiled eggs are versatile:
Quick Meals: Ideal for quick sandwiches, chicken salads, or tuna salads, especially when on the go or camping.
Prepper Pantry: Great for emergency food supplies, providing a reliable protein source.
While most people report eating their canned eggs within a year, they can last up to that long when stored properly.
4
Join the Discussion
Have you tried canning eggs? Share your experiences, tips, and questions in the comments below. We’re keen to learn from your trials and errors as we refine this process together. Stay tuned for follow-up updates and more exciting homesteading projects!
Thank you for stopping by Boots and BNY Homestead. If you have suggestions or want to see something specific, let us know. We’ll see you in the next video—happy canning!
Leave a Review
Please log in or register for a new account in order to leave a review.