How to Can Chickpeas: A Simple 3-Step Guide

chickpeas
1
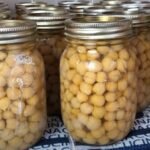
Canning your own chickpeas at home is easier than you might think, and it comes with several benefits over store-bought canned chickpeas. Not only do you control the quality and ingredients, but you also reduce waste and save money. Here, I’ll guide you through the three simple steps to canning chickpeas, and explain why this process is worth your time.
Why Can Your Own Chickpeas?
While it’s convenient to grab a can of chickpeas off the store shelf, canning your own offers several advantages. By doing it yourself, you avoid the preservatives often found in commercial canned goods and can ensure your chickpeas are free from BPA-lined cans. Additionally, chickpeas are a versatile and nutritious food, rich in iron, protein, and fiber, making them a great addition to a healthy diet. They can be used in a variety of dishes such as hummus, soups, and salads.

2
The Aquafaba Advantage
A lesser-known benefit of canning chickpeas is the liquid they produce, known as aquafaba. This liquid can be used as a vegan substitute for eggs or egg whites in many recipes, such as meringues, marshmallow fluff, or even mayonnaise. So, don’t throw away that liquid when you open your jars; it’s a valuable ingredient in its own right.
Ingredients and Equipment Needed
Dry chickpeas
Sea salt
Pressure canner
Mason jars and lids
The Canning Process

3
Step 1: Soaking
Begin by soaking your dry chickpeas for 12 to 18 hours. This step rehydrates the chickpeas and prepares them for the cooking process.
Step 2: Boiling
After soaking, boil the chickpeas for 30 minutes. This initial cooking softens the chickpeas and gets them ready for canning.
Step 3: Canning
Since chickpeas are a low-acid food, they must be pressure canned to be safely preserved. Here’s how to do it:
Filling the Jars: Fill each jar with boiled chickpeas, leaving one inch of headspace at the top. Use the cooking water to fill the jars, covering the chickpeas. Add one teaspoon of sea salt per jar for flavor and preservation.
Sealing the Jars: Place the lids and rings on the jars. Ensure they are fingertip-tight to allow air to escape during processing.

4
Pressure Canning: Place the jars in the pressure canner. Follow the manufacturer’s instructions for venting and bringing the canner to pressure. Process the jars at 11 pounds of pressure for 75 minutes (adjust for your altitude if necessary).

5
Cooling and Storing: Once the canning process is complete, allow the jars to cool for 24 hours. Remove the rings before storing the jars in a cool, dark place. Be sure to label them with the date, and use them within one year for the best quality.
Final Thoughts
Canning chickpeas at home is a simple process that can be done in just three steps: soaking, boiling, and canning. By doing it yourself, you ensure the quality and purity of your chickpeas, and you can take advantage of the versatile aquafaba for various vegan recipes. Plus, you'll have a supply of delicious and nutritious chickpeas ready to use in your favorite dishes all year round.
happy canning!

Ingredients
chickpeas
Directions
1
Canning your own chickpeas at home is easier than you might think, and it comes with several benefits over store-bought canned chickpeas. Not only do you control the quality and ingredients, but you also reduce waste and save money. Here, I’ll guide you through the three simple steps to canning chickpeas, and explain why this process is worth your time.
Why Can Your Own Chickpeas?
While it’s convenient to grab a can of chickpeas off the store shelf, canning your own offers several advantages. By doing it yourself, you avoid the preservatives often found in commercial canned goods and can ensure your chickpeas are free from BPA-lined cans. Additionally, chickpeas are a versatile and nutritious food, rich in iron, protein, and fiber, making them a great addition to a healthy diet. They can be used in a variety of dishes such as hummus, soups, and salads.

2
The Aquafaba Advantage
A lesser-known benefit of canning chickpeas is the liquid they produce, known as aquafaba. This liquid can be used as a vegan substitute for eggs or egg whites in many recipes, such as meringues, marshmallow fluff, or even mayonnaise. So, don’t throw away that liquid when you open your jars; it’s a valuable ingredient in its own right.
Ingredients and Equipment Needed
Dry chickpeas
Sea salt
Pressure canner
Mason jars and lids
The Canning Process

3
Step 1: Soaking
Begin by soaking your dry chickpeas for 12 to 18 hours. This step rehydrates the chickpeas and prepares them for the cooking process.
Step 2: Boiling
After soaking, boil the chickpeas for 30 minutes. This initial cooking softens the chickpeas and gets them ready for canning.
Step 3: Canning
Since chickpeas are a low-acid food, they must be pressure canned to be safely preserved. Here’s how to do it:
Filling the Jars: Fill each jar with boiled chickpeas, leaving one inch of headspace at the top. Use the cooking water to fill the jars, covering the chickpeas. Add one teaspoon of sea salt per jar for flavor and preservation.
Sealing the Jars: Place the lids and rings on the jars. Ensure they are fingertip-tight to allow air to escape during processing.

4
Pressure Canning: Place the jars in the pressure canner. Follow the manufacturer’s instructions for venting and bringing the canner to pressure. Process the jars at 11 pounds of pressure for 75 minutes (adjust for your altitude if necessary).

5
Cooling and Storing: Once the canning process is complete, allow the jars to cool for 24 hours. Remove the rings before storing the jars in a cool, dark place. Be sure to label them with the date, and use them within one year for the best quality.
Final Thoughts
Canning chickpeas at home is a simple process that can be done in just three steps: soaking, boiling, and canning. By doing it yourself, you ensure the quality and purity of your chickpeas, and you can take advantage of the versatile aquafaba for various vegan recipes. Plus, you'll have a supply of delicious and nutritious chickpeas ready to use in your favorite dishes all year round.
happy canning!

Leave a Review
Please log in or register for a new account in order to leave a review.


