
Canning Sweet Potatoes: A Step-by-Step Guide
potatoes
1
Welcome to Her Homestead Skills! Today, I’m Tony, and I’ll be showing you how to can sweet potatoes. Canning sweet potatoes is a great way to preserve them for future meals and ensures you have this nutritious vegetable on hand year-round. Let’s dive into the process!

2
Step 1: Preparing the Sweet Potatoes
Start by selecting long and thin sweet potatoes, which are easier to peel and cut. Peel the sweet potatoes and cut them into cubes. This batch is small, intended for six to eight pint jars. Cutting them into cubes makes them versatile for future meals; you can bake, boil, or mash them as needed.

3
Step 2: Prepping the Canner and Jars
Clean and sterilize your mason jars. For this process, we’re using a raw pack method, so you don’t need to pre-cook the sweet potatoes. Place the pressure canner on the stove with three quarts of water and a rack at the bottom. Start heating the water to a boil.

4
Step 3: Filling the Jars
Once your jars are ready, pack the sweet potato cubes into each jar, leaving about an inch of headspace at the top. Boil a pot of water separately and use it to fill the jars, covering the sweet potatoes. Add a teaspoon of salt to each jar if desired, though this step is optional.
Step 4: Removing Air Bubbles
After filling the jars with sweet potatoes and water, use a debubbler tool to remove any air bubbles. This ensures a better seal and prevents spoilage. Adjust the headspace if necessary by adding or removing some water.

5
Step 5: Sealing the Jars
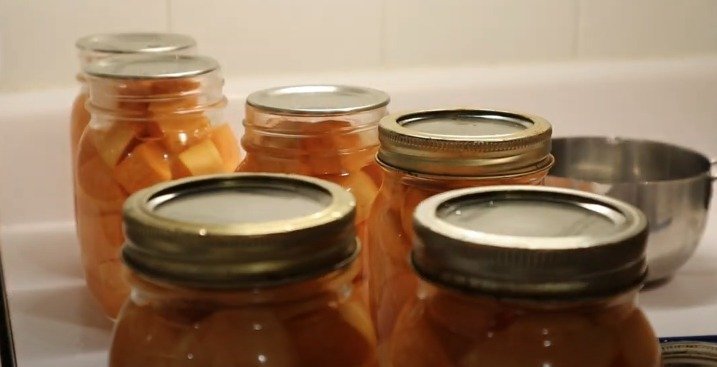
Wipe the rims of the jars with vinegar to remove any residue that might prevent a proper seal. Place the sterilized lids on the jars and secure them with rings, tightening them to fingertip tightness.
Step 6: Processing in the Pressure Canner
Place the jars in the pressure canner. Align the lid and lock it in place. Allow the canner to vent steam for 10 minutes before placing the weight on the vent pipe. Process the jars at 10-11 pounds of pressure (adjust according to your altitude) for 65 minutes if using pint jars, or 90 minutes for quart jars.
Step 7: Cooling and Storing
Once the processing time is complete, turn off the heat and let the canner cool naturally for about an hour. After the pressure has dropped, carefully remove the lid and take out the jars. Let them sit undisturbed for 12-24 hours. Check the seals before storing the jars in a cool, dark place.
Enjoy Your Canned Sweet Potatoes
Canning sweet potatoes is a great way to preserve their nutritional benefits and flavor. Use them in various dishes, such as casseroles, soups, or even as a healthy side dish.
Happy canning!

Ingredients
potatoes
Directions
1
Welcome to Her Homestead Skills! Today, I’m Tony, and I’ll be showing you how to can sweet potatoes. Canning sweet potatoes is a great way to preserve them for future meals and ensures you have this nutritious vegetable on hand year-round. Let’s dive into the process!
2
Step 1: Preparing the Sweet Potatoes
Start by selecting long and thin sweet potatoes, which are easier to peel and cut. Peel the sweet potatoes and cut them into cubes. This batch is small, intended for six to eight pint jars. Cutting them into cubes makes them versatile for future meals; you can bake, boil, or mash them as needed.
3
Step 2: Prepping the Canner and Jars
Clean and sterilize your mason jars. For this process, we’re using a raw pack method, so you don’t need to pre-cook the sweet potatoes. Place the pressure canner on the stove with three quarts of water and a rack at the bottom. Start heating the water to a boil.
4
Step 3: Filling the Jars
Once your jars are ready, pack the sweet potato cubes into each jar, leaving about an inch of headspace at the top. Boil a pot of water separately and use it to fill the jars, covering the sweet potatoes. Add a teaspoon of salt to each jar if desired, though this step is optional.
Step 4: Removing Air Bubbles
After filling the jars with sweet potatoes and water, use a debubbler tool to remove any air bubbles. This ensures a better seal and prevents spoilage. Adjust the headspace if necessary by adding or removing some water.
5
Step 5: Sealing the Jars
Wipe the rims of the jars with vinegar to remove any residue that might prevent a proper seal. Place the sterilized lids on the jars and secure them with rings, tightening them to fingertip tightness.
Step 6: Processing in the Pressure Canner
Place the jars in the pressure canner. Align the lid and lock it in place. Allow the canner to vent steam for 10 minutes before placing the weight on the vent pipe. Process the jars at 10-11 pounds of pressure (adjust according to your altitude) for 65 minutes if using pint jars, or 90 minutes for quart jars.
Step 7: Cooling and Storing
Once the processing time is complete, turn off the heat and let the canner cool naturally for about an hour. After the pressure has dropped, carefully remove the lid and take out the jars. Let them sit undisturbed for 12-24 hours. Check the seals before storing the jars in a cool, dark place.
Enjoy Your Canned Sweet Potatoes
Canning sweet potatoes is a great way to preserve their nutritional benefits and flavor. Use them in various dishes, such as casseroles, soups, or even as a healthy side dish.
Happy canning!
Leave a Review
Please log in or register for a new account in order to leave a review.


