Homemade Apple Pie Filling: A Pantry Essential

Apples: Enough to fill 12-quart jars (about half a bushel). Peel, core, and slice them thinly.
Water: 4 quarts
Sugar: 4 cups (can be reduced if desired)
Cinnamon: 2 tablespoons
Nutmeg: 1 teaspoon
Ground cloves: ½ teaspoon
Allspice: ½ teaspoon
Clear Gel: 3 cups (for thickening)
Lemon Juice: A splash for each jar to increase acidity
Vinegar: For cleaning jar rims
1
Hey everyone! Today we’re whipping up some delicious homemade apple pie filling that’s perfect for your pantry. We’re going to can it up, so let's get started!
Ingredients:
Apples: Enough to fill 12-quart jars (about half a bushel). Peel, core, and slice them thinly.
Water: 4 quarts
Sugar: 4 cups (can be reduced if desired)
Cinnamon: 2 tablespoons
Nutmeg: 1 teaspoon
Ground cloves: ½ teaspoon
Allspice: ½ teaspoon
Clear Gel: 3 cups (for thickening)
Lemon Juice: A splash for each jar to increase acidity
Vinegar: For cleaning jar rims
Instructions:
Prepare the Apples
Start by peeling, coring, and slicing your apples. Place the slices in cold water with a little lemon juice to prevent browning while you work. This will help keep the apples looking fresh and ready for canning.

2
Make the Syrup
In a large pot, combine 4 quarts of water and 4 cups of sugar. Adjust the sweetness to your taste if needed. Add in your spices: 2 tablespoons of cinnamon, 1 teaspoon of nutmeg, ½ teaspoon of ground cloves, and ½ teaspoon of allspice. Mix well to ensure everything is evenly distributed.
Add the Clear Gel
To give your filling a nice, thick consistency that’s ready to use straight from the jar, add 3 cups of clear gel to the syrup mixture. Stir it in thoroughly. This step is optional, but using clear gel means you won’t have to thicken the filling later when you’re baking.
Cook the Syrup
Put the pot on the stove and bring the mixture to a boil. Once it reaches a boil, reduce the heat and let it simmer while you prepare your jars.

3
Fill the Jars
Using hot, sterilized jars, start packing them halfway with your apple slices. Gently shake the jars to settle the apples. Then, begin adding your syrup. Pour the syrup in slowly, allowing it to seep down into the bottom of the jar. Once the syrup has settled, finish filling the jar with more apples, leaving 1-inch of headspace at the top.

4
Debubble and Finish Filling
After filling the jar with apples and syrup, use a utensil to gently move the contents around and release any trapped air bubbles. Top off with more syrup if needed to maintain that 1-inch headspace. Add a splash of lemon juice to each jar to help raise the acidity level, which is crucial for safe canning.
Clean and Seal the Jars
Wipe the rims of the jars with vinegar to ensure they’re clean and free of any residue. A clean rim is essential for a proper seal. Place the lids on the jars, then add the rings, tightening them to fingertip tightness.

5
Process in a Water Bath
Place your jars into a water bath canner. Make sure your jars are fully submerged, and bring the water to a full rolling boil. Once boiling, process the jars for 25 minutes. When the time is up, turn off the heat and let the jars sit in the canner for about 5-10 minutes to cool slightly and prevent siphoning (which can cause messy leaks).

6
Cool and Store
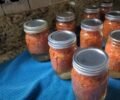
Carefully remove the jars from the canner and place them on a towel or cooling rack. Leave them undisturbed until fully cooled. You’ll hear the satisfying “pop” of the lids sealing as they cool down. Once cooled, check the seals, and if they’re all good, label your jars and store them in a cool, dark place.
And that’s it! You now have 12 beautiful quarts of homemade apple pie filling, perfect for pies, crisps, turnovers, and more. Your pantry will be well-stocked for all your baking needs!
Created by : Homestead Corner

Ingredients
Apples: Enough to fill 12-quart jars (about half a bushel). Peel, core, and slice them thinly.
Water: 4 quarts
Sugar: 4 cups (can be reduced if desired)
Cinnamon: 2 tablespoons
Nutmeg: 1 teaspoon
Ground cloves: ½ teaspoon
Allspice: ½ teaspoon
Clear Gel: 3 cups (for thickening)
Lemon Juice: A splash for each jar to increase acidity
Vinegar: For cleaning jar rims
Directions
1
Hey everyone! Today we’re whipping up some delicious homemade apple pie filling that’s perfect for your pantry. We’re going to can it up, so let's get started!
Ingredients:
Apples: Enough to fill 12-quart jars (about half a bushel). Peel, core, and slice them thinly.
Water: 4 quarts
Sugar: 4 cups (can be reduced if desired)
Cinnamon: 2 tablespoons
Nutmeg: 1 teaspoon
Ground cloves: ½ teaspoon
Allspice: ½ teaspoon
Clear Gel: 3 cups (for thickening)
Lemon Juice: A splash for each jar to increase acidity
Vinegar: For cleaning jar rims
Instructions:
Prepare the Apples
Start by peeling, coring, and slicing your apples. Place the slices in cold water with a little lemon juice to prevent browning while you work. This will help keep the apples looking fresh and ready for canning.
2
Make the Syrup
In a large pot, combine 4 quarts of water and 4 cups of sugar. Adjust the sweetness to your taste if needed. Add in your spices: 2 tablespoons of cinnamon, 1 teaspoon of nutmeg, ½ teaspoon of ground cloves, and ½ teaspoon of allspice. Mix well to ensure everything is evenly distributed.
Add the Clear Gel
To give your filling a nice, thick consistency that’s ready to use straight from the jar, add 3 cups of clear gel to the syrup mixture. Stir it in thoroughly. This step is optional, but using clear gel means you won’t have to thicken the filling later when you’re baking.
Cook the Syrup
Put the pot on the stove and bring the mixture to a boil. Once it reaches a boil, reduce the heat and let it simmer while you prepare your jars.
3
Fill the Jars
Using hot, sterilized jars, start packing them halfway with your apple slices. Gently shake the jars to settle the apples. Then, begin adding your syrup. Pour the syrup in slowly, allowing it to seep down into the bottom of the jar. Once the syrup has settled, finish filling the jar with more apples, leaving 1-inch of headspace at the top.
4
Debubble and Finish Filling
After filling the jar with apples and syrup, use a utensil to gently move the contents around and release any trapped air bubbles. Top off with more syrup if needed to maintain that 1-inch headspace. Add a splash of lemon juice to each jar to help raise the acidity level, which is crucial for safe canning.
Clean and Seal the Jars
Wipe the rims of the jars with vinegar to ensure they’re clean and free of any residue. A clean rim is essential for a proper seal. Place the lids on the jars, then add the rings, tightening them to fingertip tightness.
5
Process in a Water Bath
Place your jars into a water bath canner. Make sure your jars are fully submerged, and bring the water to a full rolling boil. Once boiling, process the jars for 25 minutes. When the time is up, turn off the heat and let the jars sit in the canner for about 5-10 minutes to cool slightly and prevent siphoning (which can cause messy leaks).
6
Cool and Store
Carefully remove the jars from the canner and place them on a towel or cooling rack. Leave them undisturbed until fully cooled. You’ll hear the satisfying “pop” of the lids sealing as they cool down. Once cooled, check the seals, and if they’re all good, label your jars and store them in a cool, dark place.
And that’s it! You now have 12 beautiful quarts of homemade apple pie filling, perfect for pies, crisps, turnovers, and more. Your pantry will be well-stocked for all your baking needs!
Created by : Homestead Corner
Leave a Review
Please log in or register for a new account in order to leave a review.