
Canning Whole Strawberries: A Step-by-Step Guide

strawberries
1 cup sugar
2 cups water
1 tsp lemon juice
1
Welcome back to Homestead Corner! I'm Jenny, and today, we’re diving into the delicious world of canning whole strawberries. While I faced some setbacks with my own strawberry plants this year, I managed to source eight pounds of fresh strawberries from a local stand. Join me as I guide you through the process of preserving these tasty berries to enjoy all year round.
Why Can Whole Strawberries?
Canning whole strawberries is an excellent way to savor the fresh taste of summer during the colder months. Unlike making jam, canning whole strawberries provides versatility. They can be used for desserts, breakfasts, or even as a topping for ice cream.
Step-by-Step Canning Process
Preparing the Strawberries
Wash the Strawberries: Give your strawberries a thorough rinse to remove any dirt or leaves. Ensure they're clean and free from any bad spots.

2
Hull the Strawberries: Use a strawberry huller or a knife to remove the leaves and the little hard white piece from the center of the strawberries.
Creating the Juice

3
Sugar Coating: Place the hulled strawberries in an 8-quart stock pot. Sprinkle about a cup of sugar over the strawberries. This helps draw out the juices, enhancing their natural sweetness.

4
Chill: Cover the pot and place it in the refrigerator for at least six hours, preferably overnight. This step is crucial for drawing out the juices from the strawberries.
Simmering

5
Simmer the Strawberries: After chilling, if there’s not enough juice, add about two cups of water. Place the pot on medium heat and bring the strawberries to a simmer without boiling them.
6
Sterilize the Jars: While the strawberries warm up, sterilize your canning jars. Place them in a water bath canner and bring to a boil to ensure they’re clean and ready for canning.

7
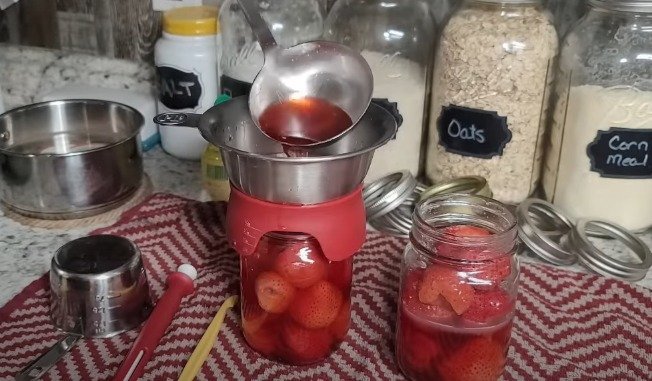
Filling the Jars
Fill the Jars: Once the strawberries are heated through, carefully fill your sterilized jars with the strawberries. Ensure each jar gets a good mix of berries and juice, leaving about an inch of headspace.
Add Lemon Juice: Add a teaspoon of lemon juice to each jar to ensure the mixture is acidic enough for safe canning.
Seal the Jars: Wipe the rims of the jars with a clean, damp paper towel. Place the lids on and screw the rings on just finger-tight.
Processing

8
Water Bath Canning: Place the filled jars back into the water bath canner. Bring to a rolling boil and process for 10 minutes for pint-sized jars, and 15 minutes for quart-sized jars.
Cool and Store: Once processed, remove the jars and let them cool overnight. In the morning, remove the rings, wash the jars, label them, and store them in your pantry.
Enjoying Your Canned Strawberries
Canned strawberries are incredibly versatile. They can be used straight from the jar for strawberry shortcake, as a topping for pancakes, waffles, cheesecake, or ice cream. You can even blend them for muffins, cakes, or turn them into jelly and jam later.
With this simple method, you can preserve the taste of summer strawberries for months to come.
Happy canning!


Ingredients
strawberries
1 cup sugar
2 cups water
1 tsp lemon juice
Directions
1
Welcome back to Homestead Corner! I'm Jenny, and today, we’re diving into the delicious world of canning whole strawberries. While I faced some setbacks with my own strawberry plants this year, I managed to source eight pounds of fresh strawberries from a local stand. Join me as I guide you through the process of preserving these tasty berries to enjoy all year round.
Why Can Whole Strawberries?
Canning whole strawberries is an excellent way to savor the fresh taste of summer during the colder months. Unlike making jam, canning whole strawberries provides versatility. They can be used for desserts, breakfasts, or even as a topping for ice cream.
Step-by-Step Canning Process
Preparing the Strawberries
Wash the Strawberries: Give your strawberries a thorough rinse to remove any dirt or leaves. Ensure they're clean and free from any bad spots.
2
Hull the Strawberries: Use a strawberry huller or a knife to remove the leaves and the little hard white piece from the center of the strawberries.
Creating the Juice
3
Sugar Coating: Place the hulled strawberries in an 8-quart stock pot. Sprinkle about a cup of sugar over the strawberries. This helps draw out the juices, enhancing their natural sweetness.
4
Chill: Cover the pot and place it in the refrigerator for at least six hours, preferably overnight. This step is crucial for drawing out the juices from the strawberries.
Simmering
5
Simmer the Strawberries: After chilling, if there’s not enough juice, add about two cups of water. Place the pot on medium heat and bring the strawberries to a simmer without boiling them.
6
Sterilize the Jars: While the strawberries warm up, sterilize your canning jars. Place them in a water bath canner and bring to a boil to ensure they’re clean and ready for canning.
7
Filling the Jars
Fill the Jars: Once the strawberries are heated through, carefully fill your sterilized jars with the strawberries. Ensure each jar gets a good mix of berries and juice, leaving about an inch of headspace.
Add Lemon Juice: Add a teaspoon of lemon juice to each jar to ensure the mixture is acidic enough for safe canning.
Seal the Jars: Wipe the rims of the jars with a clean, damp paper towel. Place the lids on and screw the rings on just finger-tight.
Processing
8
Water Bath Canning: Place the filled jars back into the water bath canner. Bring to a rolling boil and process for 10 minutes for pint-sized jars, and 15 minutes for quart-sized jars.
Cool and Store: Once processed, remove the jars and let them cool overnight. In the morning, remove the rings, wash the jars, label them, and store them in your pantry.
Enjoying Your Canned Strawberries
Canned strawberries are incredibly versatile. They can be used straight from the jar for strawberry shortcake, as a topping for pancakes, waffles, cheesecake, or ice cream. You can even blend them for muffins, cakes, or turn them into jelly and jam later.
With this simple method, you can preserve the taste of summer strawberries for months to come.
Happy canning!
Leave a Review
Please log in or register for a new account in order to leave a review.


