
Canning Pineapples: A Step-by-Step Guide to Food Security and Self-Reliance

Pineapples
8 cups water
1 cup sugar
1
Good morning and welcome to Rose Red Homestead! Today, we are excited to share a fantastic find and a valuable skill: canning pineapples. Jim recently found pineapples at Smith's Grocery Store for just 97 cents each, compared to $3.99 at another store. This significant price difference inspired us to take advantage of the sale and can some pineapple, a great addition to our food storage.
Why Canning is Essential for Self-Reliance
Canning is a valuable skill that promotes self-reliance and food security. By knowing how to can, whether through water bath or pressure canning, you can preserve food when you find great deals, ensuring you always have nutritious options on hand. The USDA provides trusted recipes for canning, including pineapple, making the process safe and straightforward.

2
Preparing Pineapples for Canning
Tools and Preparation
To start, you'll need a pineapple corer and slicer, a gadget that simplifies the process. Begin by washing your hands and the pineapples thoroughly. This step is crucial for maintaining cleanliness, as the pineapples will be cut directly on the sheet pan, capturing the juice without creating a mess.

3
Coring and Slicing
Cut the Pineapple: Use a regular knife to cut about half an inch from the top of the pineapple. This exposes the core.
Use the Corer: Place the corer over the exposed core. The corer's zigzag edge will cut through the pineapple as you twist it. Apply pressure and twist until you reach the bottom.

4
Use the Corer: Place the corer over the exposed core. The corer's zigzag edge will cut through the pineapple as you twist it. Apply pressure and twist until you reach the bottom.
Remove the Pineapple: Once the corer reaches the bottom, tilt the pineapple and pull out the core and sliced pineapple rings. Save the juice for canning.

5
Making Pineapple Chunks
For chunk pineapple, cut the rings into bite-sized pieces and remove any remaining eyes. Place the chunks in a pot, ready for canning.

6
Making Pineapple Chunks
For chunk pineapple, cut the rings into bite-sized pieces and remove any remaining eyes. Place the chunks in a pot, ready for canning.
Canning Process
Preparing the Syrup
Make Light Syrup: Prepare a light syrup using 8 cups of water and 1 cup of sugar. Heat until boiling.
Combine Pineapple and Syrup: Add the pineapple chunks to the syrup and let it boil together for 10 minutes. This ensures the pineapple and syrup are hot throughout.
Filling the Jars
Sterilize Jars: Ensure your jars are clean and sterilized.
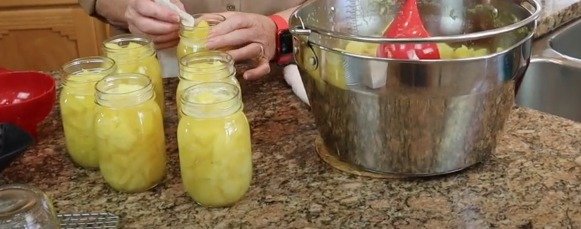
Fill with Pineapple and Syrup: Carefully fill the jars with hot pineapple chunks and syrup, leaving about half an inch of space at the top.

7
Remove Air Bubbles: Use a wet paper towel to wipe the rims of the jars, removing any air bubbles.
Water Bath Canning

8
Prepare the Water Bath: Fill a large pot with water and bring it to a simmer.
9
Process the Jars: Place the filled jars in the pot, ensuring they are covered with about an inch of water. Bring to a rolling boil and process for 20 minutes.

10
Cool the Jars: Remove the jars and let them cool. You should hear the lids popping, indicating a proper seal.
Storing Your Canned Pineapples
We canned 14 pints of pineapple from 10 pineapples. This includes one pint mostly filled with juice, perfect for various recipes. Store your canned pineapples in a cool, dark place, and enjoy the taste of fresh pineapples all year round.
Conclusion
Canning pineapples is a rewarding way to take advantage of sales and enhance your food storage. By following these steps and using the USDA guidelines, you can ensure a safe and delicious result. Thank you for joining us at Rose Red Homestead, and happy canning!


Ingredients
Pineapples
8 cups water
1 cup sugar
Directions
1
Good morning and welcome to Rose Red Homestead! Today, we are excited to share a fantastic find and a valuable skill: canning pineapples. Jim recently found pineapples at Smith's Grocery Store for just 97 cents each, compared to $3.99 at another store. This significant price difference inspired us to take advantage of the sale and can some pineapple, a great addition to our food storage.
Why Canning is Essential for Self-Reliance
Canning is a valuable skill that promotes self-reliance and food security. By knowing how to can, whether through water bath or pressure canning, you can preserve food when you find great deals, ensuring you always have nutritious options on hand. The USDA provides trusted recipes for canning, including pineapple, making the process safe and straightforward.
2
Preparing Pineapples for Canning
Tools and Preparation
To start, you'll need a pineapple corer and slicer, a gadget that simplifies the process. Begin by washing your hands and the pineapples thoroughly. This step is crucial for maintaining cleanliness, as the pineapples will be cut directly on the sheet pan, capturing the juice without creating a mess.
3
Coring and Slicing
Cut the Pineapple: Use a regular knife to cut about half an inch from the top of the pineapple. This exposes the core.
Use the Corer: Place the corer over the exposed core. The corer's zigzag edge will cut through the pineapple as you twist it. Apply pressure and twist until you reach the bottom.
4
Use the Corer: Place the corer over the exposed core. The corer's zigzag edge will cut through the pineapple as you twist it. Apply pressure and twist until you reach the bottom.
Remove the Pineapple: Once the corer reaches the bottom, tilt the pineapple and pull out the core and sliced pineapple rings. Save the juice for canning.
5
Making Pineapple Chunks
For chunk pineapple, cut the rings into bite-sized pieces and remove any remaining eyes. Place the chunks in a pot, ready for canning.
6
Making Pineapple Chunks
For chunk pineapple, cut the rings into bite-sized pieces and remove any remaining eyes. Place the chunks in a pot, ready for canning.
Canning Process
Preparing the Syrup
Make Light Syrup: Prepare a light syrup using 8 cups of water and 1 cup of sugar. Heat until boiling.
Combine Pineapple and Syrup: Add the pineapple chunks to the syrup and let it boil together for 10 minutes. This ensures the pineapple and syrup are hot throughout.
Filling the Jars
Sterilize Jars: Ensure your jars are clean and sterilized.
Fill with Pineapple and Syrup: Carefully fill the jars with hot pineapple chunks and syrup, leaving about half an inch of space at the top.
7
Remove Air Bubbles: Use a wet paper towel to wipe the rims of the jars, removing any air bubbles.
Water Bath Canning
8
Prepare the Water Bath: Fill a large pot with water and bring it to a simmer.
9
Process the Jars: Place the filled jars in the pot, ensuring they are covered with about an inch of water. Bring to a rolling boil and process for 20 minutes.
10
Cool the Jars: Remove the jars and let them cool. You should hear the lids popping, indicating a proper seal.
Storing Your Canned Pineapples
We canned 14 pints of pineapple from 10 pineapples. This includes one pint mostly filled with juice, perfect for various recipes. Store your canned pineapples in a cool, dark place, and enjoy the taste of fresh pineapples all year round.
Conclusion
Canning pineapples is a rewarding way to take advantage of sales and enhance your food storage. By following these steps and using the USDA guidelines, you can ensure a safe and delicious result. Thank you for joining us at Rose Red Homestead, and happy canning!
Leave a Review
Please log in or register for a new account in order to leave a review.


