
Behind the Scenes of Canning Onion Veggie Stock: A Step-by-Step Guide
onions
1
Welcome back to the Needy Homesteader Channel! Today, I’m taking you behind the scenes of prepping and canning onion veggie stock. If you’re new to canning or just looking for some tips, follow along as I share my process, tools, and a few personal stories that make this journey so special.

2
Step 1: Preparing the Canner
First, I fill up my canner to the 3-inch mark. I’ve marked this line with a black marker for easy reference. If I run the canner a second time, I remeasure and adjust the water level to ensure it’s exactly 3 inches.
Step 2: Setting Up Your Station
Add a splash of vinegar to your canner and lay out a cloth. This makes the process much easier. Set up a small station on your right side (or left if you're left-handed) with your jar lifters, funnel, and other tools. Even though everything is clean, I like to give it all a good wash again to ensure it's spotless.
Step 3: Preparing the Jars and Lids
Make sure your sink is clean – a must before washing anything. I use Ball canning lids and always wash them in hot soapy water to remove any potential contaminants. This step is crucial as the plasticol sealer on the lids can attract pests.
Step 4: Choosing Your Tools
Over the years, I've accumulated various canning ladles. My first one, though broken, holds sentimental value, so I keep it. I recently bought a new one that’s a blend of red and purple. It’s important to have reliable tools, so make sure your ladles and other utensils are in good condition.
Step 5: Filtering the Broth
Using high-quality cheesecloth makes a significant difference. I prefer Grade 100 cheesecloth, which is washable and reusable. Double layering the cheesecloth helps to filter out any debris, giving you a clear broth. Wet the cheesecloth before use to prevent it from collapsing into the funnel under the weight of the veggies.
Step 6: Filling the Jars
Heat your canner on low to keep the water hot. Remember, when canning hot stock, both the jars and the stock need to be hot. Ladle the broth slowly to avoid stirring up sediment, which makes the broth cloudy. Aim for a 1-inch headspace in each jar. Clean the jar rims with vinegar, place the lids, and tighten the bands fingertip tight.
Step 7: Canning Process

3
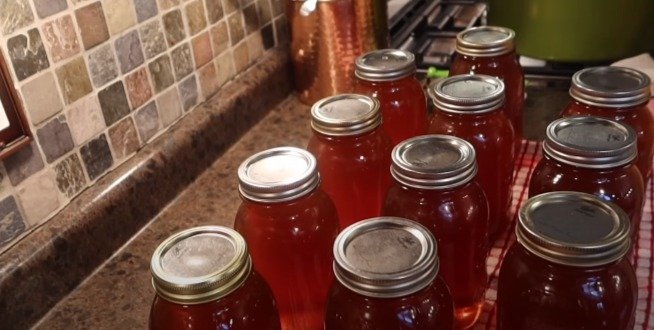
Once your jars are ready, place them in the canner. Process quart jars for 35 minutes at the recommended pressure. Listen for the satisfying “pop” of the lids sealing as you remove the jars from the canner.
Step 8: Utilizing Leftover Vegetables
Don't waste the leftover vegetables from your stock. If they still have some life, reuse them with beef bones to make bone broth. This ensures you extract every ounce of flavor and nothing goes to waste.

4
Conclusion
Canning your own stock is a rewarding process that nourishes your family and fills your pantry with beautiful jars of homemade goodness. Whether it's for soups, stews, or any dish that calls for water, replacing it with stock adds incredible flavor.
Happy canning and God bless!

Ingredients
onions
Directions
1
Welcome back to the Needy Homesteader Channel! Today, I’m taking you behind the scenes of prepping and canning onion veggie stock. If you’re new to canning or just looking for some tips, follow along as I share my process, tools, and a few personal stories that make this journey so special.
2
Step 1: Preparing the Canner
First, I fill up my canner to the 3-inch mark. I’ve marked this line with a black marker for easy reference. If I run the canner a second time, I remeasure and adjust the water level to ensure it’s exactly 3 inches.
Step 2: Setting Up Your Station
Add a splash of vinegar to your canner and lay out a cloth. This makes the process much easier. Set up a small station on your right side (or left if you're left-handed) with your jar lifters, funnel, and other tools. Even though everything is clean, I like to give it all a good wash again to ensure it's spotless.
Step 3: Preparing the Jars and Lids
Make sure your sink is clean – a must before washing anything. I use Ball canning lids and always wash them in hot soapy water to remove any potential contaminants. This step is crucial as the plasticol sealer on the lids can attract pests.
Step 4: Choosing Your Tools
Over the years, I've accumulated various canning ladles. My first one, though broken, holds sentimental value, so I keep it. I recently bought a new one that’s a blend of red and purple. It’s important to have reliable tools, so make sure your ladles and other utensils are in good condition.
Step 5: Filtering the Broth
Using high-quality cheesecloth makes a significant difference. I prefer Grade 100 cheesecloth, which is washable and reusable. Double layering the cheesecloth helps to filter out any debris, giving you a clear broth. Wet the cheesecloth before use to prevent it from collapsing into the funnel under the weight of the veggies.
Step 6: Filling the Jars
Heat your canner on low to keep the water hot. Remember, when canning hot stock, both the jars and the stock need to be hot. Ladle the broth slowly to avoid stirring up sediment, which makes the broth cloudy. Aim for a 1-inch headspace in each jar. Clean the jar rims with vinegar, place the lids, and tighten the bands fingertip tight.
Step 7: Canning Process
3
Once your jars are ready, place them in the canner. Process quart jars for 35 minutes at the recommended pressure. Listen for the satisfying “pop” of the lids sealing as you remove the jars from the canner.
Step 8: Utilizing Leftover Vegetables
Don't waste the leftover vegetables from your stock. If they still have some life, reuse them with beef bones to make bone broth. This ensures you extract every ounce of flavor and nothing goes to waste.
4
Conclusion
Canning your own stock is a rewarding process that nourishes your family and fills your pantry with beautiful jars of homemade goodness. Whether it's for soups, stews, or any dish that calls for water, replacing it with stock adds incredible flavor.
Happy canning and God bless!
Leave a Review
Please log in or register for a new account in order to leave a review.


