
Title: The Ultimate Guide to Canning Fresh Green Beans: A Step-by-Step Process for Preserving Quality

green beans
salt
1
Are you looking to preserve the vibrant flavors of fresh green beans? Canning is an excellent method to ensure you have delicious beans ready to enjoy anytime. In this comprehensive guide, we'll walk you through the step-by-step process of canning young and tender green beans to perfection.
Selecting the Best Green Beans
When it comes to canning, the quality of your produce matters. Opt for young and tender green beans for the best results. Wash them thoroughly in cold water to remove any dirt or debris. Trim the ends by cutting them or snapping them off with your fingers.
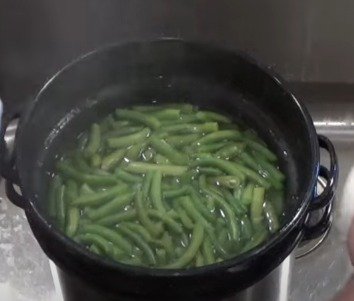
Blanching for Optimal Flavor
Blanching is a crucial step in preserving the flavor and color of green beans. Break the beans into pieces and blanch them in a pot of boiling water for five minutes. Once done, transfer the beans to a sink and remove them from the cooking water. Remember to save the cooking water for later use.

2
Preparing Jars and Lids
While the beans are blanching, prepare your jars and lids. Use hot sterilized jars and add canning salt to each one. One teaspoon of salt per quart or half a teaspoon per pint is sufficient. Heat your pressure cooker with three quarts of water and simmer the lids in a separate pot to soften the seals.
Packaging the Green Beans

3
Pack the hot green beans into the jars, leaving about an inch of headspace at the top. Ladle the hot cooking water over the beans, ensuring the headspace is maintained. Use a nonmetallic spatula to remove air bubbles and wipe the jar rims clean.

4
Sealing and Processing
Using a magnetic lid lifter, place a softened lid on each jar and secure it with a band. Load the jars into the pressure canner and process them at the appropriate pressure and time—20 minutes for pints and 25 minutes for quarts.

5
Cooling and Storage
Once the processing time is up, turn off the heat and allow the pressure to return to zero naturally. Remove the jars from the canner and place them on a towel to cool for 12 to 24 hours. Check for a good vacuum seal before consuming the canned green beans.

6
Final Thoughts
Canning fresh green beans is a rewarding way to enjoy their flavors all year round. By following these simple steps, you can preserve the quality and taste of your beans for months to come. Happy canning!


Ingredients
green beans
salt
Directions
1
Are you looking to preserve the vibrant flavors of fresh green beans? Canning is an excellent method to ensure you have delicious beans ready to enjoy anytime. In this comprehensive guide, we'll walk you through the step-by-step process of canning young and tender green beans to perfection.
Selecting the Best Green Beans
When it comes to canning, the quality of your produce matters. Opt for young and tender green beans for the best results. Wash them thoroughly in cold water to remove any dirt or debris. Trim the ends by cutting them or snapping them off with your fingers.
Blanching for Optimal Flavor
Blanching is a crucial step in preserving the flavor and color of green beans. Break the beans into pieces and blanch them in a pot of boiling water for five minutes. Once done, transfer the beans to a sink and remove them from the cooking water. Remember to save the cooking water for later use.
2
Preparing Jars and Lids
While the beans are blanching, prepare your jars and lids. Use hot sterilized jars and add canning salt to each one. One teaspoon of salt per quart or half a teaspoon per pint is sufficient. Heat your pressure cooker with three quarts of water and simmer the lids in a separate pot to soften the seals.
Packaging the Green Beans
3
Pack the hot green beans into the jars, leaving about an inch of headspace at the top. Ladle the hot cooking water over the beans, ensuring the headspace is maintained. Use a nonmetallic spatula to remove air bubbles and wipe the jar rims clean.
4
Sealing and Processing
Using a magnetic lid lifter, place a softened lid on each jar and secure it with a band. Load the jars into the pressure canner and process them at the appropriate pressure and time—20 minutes for pints and 25 minutes for quarts.
5
Cooling and Storage
Once the processing time is up, turn off the heat and allow the pressure to return to zero naturally. Remove the jars from the canner and place them on a towel to cool for 12 to 24 hours. Check for a good vacuum seal before consuming the canned green beans.
6
Final Thoughts
Canning fresh green beans is a rewarding way to enjoy their flavors all year round. By following these simple steps, you can preserve the quality and taste of your beans for months to come. Happy canning!
Leave a Review
Please log in or register for a new account in order to leave a review.


