
How to Make Perfectly Crunchy Homemade Pickles: A Step-by-Step Guide

cucumbers
1 tbsp kosher salt
3 cups water
2 cups white vinegar
Cayenne
Garlic
Peppercorns
Fresh dill
red jalapeno peppers
Onion slices
1
Hey everyone, Lucy here from Virginia Grace Living!Today, I'm sharing my family's favorite recipe for crunchy homemade pickles. As a bonus, I’ll also show you how to pickle okra using the same brine. Let’s dive in!

2
Getting Started: Prepping Your Pickles
First things first, you'll need to wash your cucumbers thoroughly. After washing, trim both ends of each cucumber. This step is crucial for ensuring your pickles remain crispy, as the blossom end contains an enzyme that can cause pickles to soften over time.
3
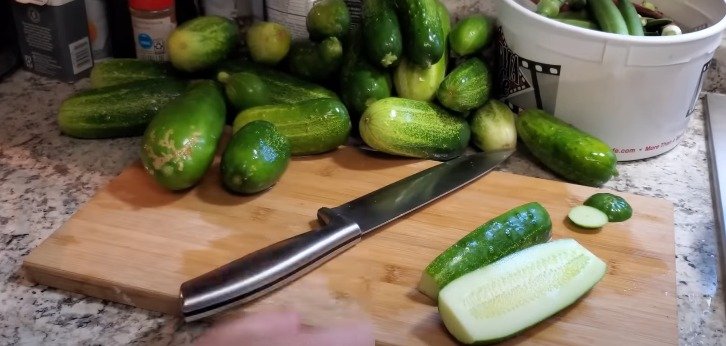
Cutting Your Cucumbers
For pickle spears, cut the cucumber in half lengthwise, then cut each half again into quarters. If your cucumbers are particularly large, you may want to cut them into even smaller spears. The goal is to have uniform pieces that will pickle evenly.
4
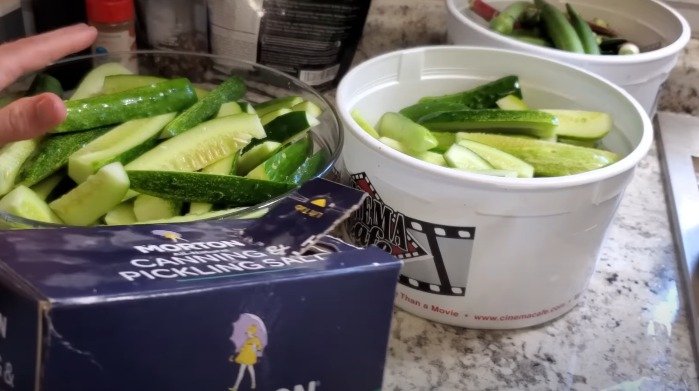
Salting and Icing
Once your cucumbers are cut, it's time to salt and ice them. Sprinkle a generous amount of non-iodized pickling salt (or kosher salt) over the cucumbers. Toss them to ensure an even coating. Then, cover the cucumbers with ice and let them sit for at least one to two hours. This process helps draw out excess moisture and keeps the cucumbers cool during canning, contributing to that desired crunchiness.

5
Preparing the Brine
For the brine, I use a simple mixture:
3 cups of water
2 cups of white vinegar
1 tablespoon of kosher salt
Heat the mixture until the salt dissolves completely. You can adjust the ratio based on your preference, but I find this balance works perfectly.

6
Adding Flavor: Pickling Ingredients
Here’s where you can get creative. I like to add:
Peppercorns
Fresh dill
Cayenne and red jalapeno peppers (optional for some heat)
Onion slices
Garlic cloves
Distribute these ingredients evenly among your jars.

7
Packing the Jars
Drain the cucumbers from the ice bath and pack them tightly into jars. Fill each jar with the prepared brine, leaving about 1/2 inch of headspace at the top. Wipe the rims of the jars with a clean paper towel to ensure a good seal.

8
Canning Process
Place the jars in a water bath canner, ensuring they are covered by at least an inch of water. Boil for 10 minutes. After boiling, carefully remove the jars and place them on a towel to cool. You’ll hear the satisfying "pop" of the jars sealing as they cool. Let them sit undisturbed for 12 to 24 hours.
Final Touches
Before storing your pickles, make sure they are sealed properly. Any jars that haven’t sealed can be refrigerated and consumed first. Your pickles are now ready to enjoy! They make fantastic gifts and are a hit at any gathering.

9
Bonus: Pickling Okra
You can use the same brine and process to pickle okra. Follow the same steps, but note that okra won't be as crispy as cucumbers. Pickled okra is a family favorite and adds a unique touch to your pickle collection.

10
Conclusion
I hope you enjoy this pickle recipe and give it a try. Feel free to get creative with the spices and flavors. Pickles make wonderful gifts and are a great addition to your pantry.
happy pickling!


Ingredients
cucumbers
1 tbsp kosher salt
3 cups water
2 cups white vinegar
Cayenne
Garlic
Peppercorns
Fresh dill
red jalapeno peppers
Onion slices
Directions
1
Hey everyone, Lucy here from Virginia Grace Living!Today, I'm sharing my family's favorite recipe for crunchy homemade pickles. As a bonus, I’ll also show you how to pickle okra using the same brine. Let’s dive in!
2
Getting Started: Prepping Your Pickles
First things first, you'll need to wash your cucumbers thoroughly. After washing, trim both ends of each cucumber. This step is crucial for ensuring your pickles remain crispy, as the blossom end contains an enzyme that can cause pickles to soften over time.
3
Cutting Your Cucumbers
For pickle spears, cut the cucumber in half lengthwise, then cut each half again into quarters. If your cucumbers are particularly large, you may want to cut them into even smaller spears. The goal is to have uniform pieces that will pickle evenly.
4
Salting and Icing
Once your cucumbers are cut, it's time to salt and ice them. Sprinkle a generous amount of non-iodized pickling salt (or kosher salt) over the cucumbers. Toss them to ensure an even coating. Then, cover the cucumbers with ice and let them sit for at least one to two hours. This process helps draw out excess moisture and keeps the cucumbers cool during canning, contributing to that desired crunchiness.
5
Preparing the Brine
For the brine, I use a simple mixture:
3 cups of water
2 cups of white vinegar
1 tablespoon of kosher salt
Heat the mixture until the salt dissolves completely. You can adjust the ratio based on your preference, but I find this balance works perfectly.
6
Adding Flavor: Pickling Ingredients
Here’s where you can get creative. I like to add:
Peppercorns
Fresh dill
Cayenne and red jalapeno peppers (optional for some heat)
Onion slices
Garlic cloves
Distribute these ingredients evenly among your jars.
7
Packing the Jars
Drain the cucumbers from the ice bath and pack them tightly into jars. Fill each jar with the prepared brine, leaving about 1/2 inch of headspace at the top. Wipe the rims of the jars with a clean paper towel to ensure a good seal.
8
Canning Process
Place the jars in a water bath canner, ensuring they are covered by at least an inch of water. Boil for 10 minutes. After boiling, carefully remove the jars and place them on a towel to cool. You’ll hear the satisfying "pop" of the jars sealing as they cool. Let them sit undisturbed for 12 to 24 hours.
Final Touches
Before storing your pickles, make sure they are sealed properly. Any jars that haven’t sealed can be refrigerated and consumed first. Your pickles are now ready to enjoy! They make fantastic gifts and are a hit at any gathering.
9
Bonus: Pickling Okra
You can use the same brine and process to pickle okra. Follow the same steps, but note that okra won't be as crispy as cucumbers. Pickled okra is a family favorite and adds a unique touch to your pickle collection.
10
Conclusion
I hope you enjoy this pickle recipe and give it a try. Feel free to get creative with the spices and flavors. Pickles make wonderful gifts and are a great addition to your pantry.
happy pickling!
Leave a Review
Please log in or register for a new account in order to leave a review.


