
How to Make and Preserve Split Pea Soup with Ham: A Step-by-Step Guide
1
Good morning and welcome to Rose-Red Homestead! It's a couple of days after Christmas, and outside, the snow is falling gently. We've had more snow this year than in the past two years combined, giving us a half-white Christmas. Today, we’re turning our leftover ham into a delicious and hearty split pea soup with ham. This soup is not only simple to make but also perfect for preserving, providing a ready-to-eat meal straight from your pantry during the cold winter months.

2
Ingredients and Preparation
For this recipe, which follows USDA guidelines for using cured meats, you will need the following ingredients for seven quarts of soup:
6 cups of split peas (3 pounds)
24 cups of liquid (water, stock, or broth)
3 cups of chopped onions (use dehydrated onions if needed)
4.5 cups of sliced carrots
3 cups of cooked ham
3 bay leaves
Step 1: Simmer the Peas
Begin by simmering 6 cups of split peas in 24 cups of liquid for one hour. You can use water or any stock/broth you have on hand. For added flavor, onion stock is a great choice.
After simmering, the peas should be soft and have absorbed much of the liquid. At this point, you can either leave the peas as they are or blend them for a smoother texture. We prefer blending for a creamy consistency.
Step 2: Add the Ingredients
Once the peas are ready, add 3 cups of chopped onions, 4.5 cups of sliced carrots, 3 cups of cooked ham, and 3 bay leaves. If you’re short on fresh onions, substitute with dehydrated onions.

3
Stir everything together and simmer for another 30 minutes.
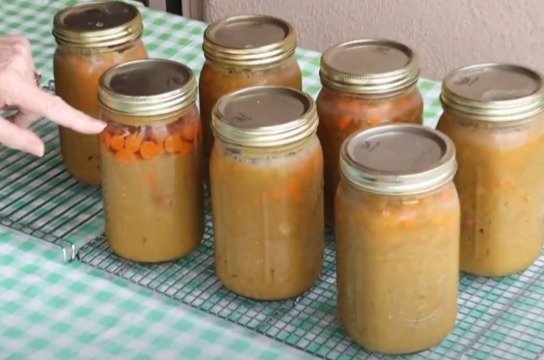
Step 3: Preparing for Canning
After the final simmer, remove the bay leaves and ladle the hot soup into clean, hot jars, leaving about an inch of headspace.
Clean the jar rims with a wet paper towel to ensure a good seal. Place the lids and rings on the jars.
Step 4: Pressure Canning

4
Place the jars in a pressure canner. For those at elevations over 1,000 feet, process the jars at 13 pounds per square inch (psi) for 90 minutes. This ensures that the temperature reaches between 240°F and 250°F, which is necessary to kill any potential botulism spores.

5
Once the processing time is complete, let the canner cool down naturally before removing the jars. Be cautious as the canner will still be hot.

6
Post-Canning Tips
Separation: It's normal for the pea material to settle at the bottom of the jars. When reheating, stir the soup well to avoid scorching the bottom layer.
Storage: Store your canned soup in a cool, dark place. The soup may separate while on the shelf, but this is normal and does not affect the quality.
Conclusion
Enjoy the warmth and comfort of split pea soup with ham during the winter months with this easy-to-follow recipe. By preserving your soup through pressure canning, you ensure a nutritious, ready-to-eat meal is always at hand. Thank you for joining us at Rose-Red Homestead, and we hope to see you again for more delicious, home-canned recipes. Stay warm and happy canning!

Ingredients
Directions
1
Good morning and welcome to Rose-Red Homestead! It's a couple of days after Christmas, and outside, the snow is falling gently. We've had more snow this year than in the past two years combined, giving us a half-white Christmas. Today, we’re turning our leftover ham into a delicious and hearty split pea soup with ham. This soup is not only simple to make but also perfect for preserving, providing a ready-to-eat meal straight from your pantry during the cold winter months.
2
Ingredients and Preparation
For this recipe, which follows USDA guidelines for using cured meats, you will need the following ingredients for seven quarts of soup:
6 cups of split peas (3 pounds)
24 cups of liquid (water, stock, or broth)
3 cups of chopped onions (use dehydrated onions if needed)
4.5 cups of sliced carrots
3 cups of cooked ham
3 bay leaves
Step 1: Simmer the Peas
Begin by simmering 6 cups of split peas in 24 cups of liquid for one hour. You can use water or any stock/broth you have on hand. For added flavor, onion stock is a great choice.
After simmering, the peas should be soft and have absorbed much of the liquid. At this point, you can either leave the peas as they are or blend them for a smoother texture. We prefer blending for a creamy consistency.
Step 2: Add the Ingredients
Once the peas are ready, add 3 cups of chopped onions, 4.5 cups of sliced carrots, 3 cups of cooked ham, and 3 bay leaves. If you’re short on fresh onions, substitute with dehydrated onions.
3
Stir everything together and simmer for another 30 minutes.
Step 3: Preparing for Canning
After the final simmer, remove the bay leaves and ladle the hot soup into clean, hot jars, leaving about an inch of headspace.
Clean the jar rims with a wet paper towel to ensure a good seal. Place the lids and rings on the jars.
Step 4: Pressure Canning
4
Place the jars in a pressure canner. For those at elevations over 1,000 feet, process the jars at 13 pounds per square inch (psi) for 90 minutes. This ensures that the temperature reaches between 240°F and 250°F, which is necessary to kill any potential botulism spores.
5
Once the processing time is complete, let the canner cool down naturally before removing the jars. Be cautious as the canner will still be hot.
6
Post-Canning Tips
Separation: It's normal for the pea material to settle at the bottom of the jars. When reheating, stir the soup well to avoid scorching the bottom layer.
Storage: Store your canned soup in a cool, dark place. The soup may separate while on the shelf, but this is normal and does not affect the quality.
Conclusion
Enjoy the warmth and comfort of split pea soup with ham during the winter months with this easy-to-follow recipe. By preserving your soup through pressure canning, you ensure a nutritious, ready-to-eat meal is always at hand. Thank you for joining us at Rose-Red Homestead, and we hope to see you again for more delicious, home-canned recipes. Stay warm and happy canning!
Leave a Review
Please log in or register for a new account in order to leave a review.


