How to Easily Can Beef Stew at Home: A Step-by-Step Guide

beef
potatoes
onions
carrots
salt
1
Welcome to Homesteading Family! I'm Carolyn, and today, I'm excited to show you one of the simplest and most satisfying meals you can preserve at home: beef stew. Not only is this project quick and easy, but the results are delicious and convenient. Imagine having ready-made, healthy meals on your shelf that are budget-friendly and perfect for those busy days. Let’s dive into the process of canning beef stew, ensuring you have everything you need to get started.
2
Essential Equipment for Canning Beef Stew
Before we get into the recipe, let's gather our equipment. Here’s what you’ll need:
Jar lifters: Essential for safely handling hot jars.
Bubble remover tool: This helps eliminate air bubbles from the jars. Any wooden or plastic implement can work.

3
Measuring spoons: For accurate seasoning.
Clean kitchen towels and dish cloth: For maintaining hygiene.
White vinegar: Useful for cleaning jar rims to ensure a good seal.
Mason jars: Wide-mouth quart-size jars are ideal, but pint-size or half-pint jars can also be used.
New lids and bands: Ensure they are clean and ready for use.

4
Pressure canner: Required for safely canning meat and low-acid vegetables.

5
Ingredients for Canning Beef Stew
This recipe is wonderfully flexible. You can adjust the quantities to suit your taste and the size of your jars.

6
Here are the basic ingredients:
Stew beef (or substitute with venison, or chicken)
Potatoes: Peeled and chopped.
Onions: Peeled and chopped.
Carrots: Peeled and chopped.
Salt: Use any good quality salt. Note that salts with minerals might make the broth cloudy, but this is normal and safe.

7
Step-by-Step Canning Process
Step 1: Prepare Your Jars and Canner
Clean your jars with hot, soapy water and keep them warm. Prepare your lids and bands similarly. Add about two inches of water to your pressure canner and start warming it up slowly.
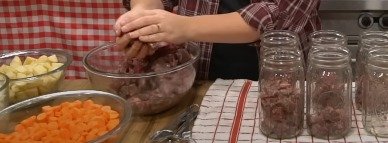
Step 2: Fill the Jars
Start by filling your jars with meat, followed by potatoes, carrots, and onions. Ensure you leave about one inch of headspace at the top of each jar. Add a teaspoon of salt per quart-sized jar. You can also add other dry herbs and spices at this stage.

8
Step 3: Add Liquid and Remove Bubbles
Pour hot water or broth into the jars, covering the ingredients while maintaining the one-inch headspace. Use the bubble remover tool to release any trapped air.
Step 4: Clean and Seal the Jars
Clean the rims of the jars with white vinegar and a clean cloth to ensure a proper seal. Place the lids on the jars and screw on the bands until they are finger-tight.
Step 5: Load the Canner
Place the jars in the pressure canner on a rack to prevent direct contact with the bottom. Ensure the water level is correct, then secure the canner lid.

9
Step 6: Vent and Pressurize
Heat the canner until it starts steaming. Let it vent for 10 minutes, then place the weight on the vent. Bring the canner up to the appropriate pressure for your altitude (15 pounds for most areas).
Step 7: Process the Jars
Once the canner reaches the desired pressure, process the jars for 90 minutes. Maintain a steady pressure throughout the process.
Step 8: Cool the Canner
Turn off the heat and allow the canner to cool naturally until it reaches zero pressure. Do not rush this step as it can affect the final seal.
Step 9: Remove and Check the Jars
Carefully remove the jars from the canner and place them on a towel, leaving space between them. Let them cool for 16-18 hours. Check the seals by pressing the center of each lid. If it does not pop back, the jar is sealed.
Step 10: Store Your Stew
Label your jars with the contents and date. Store them in a cool, dark place. Your canned beef stew is now ready to enjoy!
Enjoy Your Homemade Beef Stew
When you’re ready to eat, simply open a jar, heat the stew, and serve it over noodles, rice, or with a side of bread and salad. It’s a hearty, delicious meal that’s ready in minutes. Happy canning!

Ingredients
beef
potatoes
onions
carrots
salt
Directions
1
Welcome to Homesteading Family! I'm Carolyn, and today, I'm excited to show you one of the simplest and most satisfying meals you can preserve at home: beef stew. Not only is this project quick and easy, but the results are delicious and convenient. Imagine having ready-made, healthy meals on your shelf that are budget-friendly and perfect for those busy days. Let’s dive into the process of canning beef stew, ensuring you have everything you need to get started.
2
Essential Equipment for Canning Beef Stew
Before we get into the recipe, let's gather our equipment. Here’s what you’ll need:
Jar lifters: Essential for safely handling hot jars.
Bubble remover tool: This helps eliminate air bubbles from the jars. Any wooden or plastic implement can work.
3
Measuring spoons: For accurate seasoning.
Clean kitchen towels and dish cloth: For maintaining hygiene.
White vinegar: Useful for cleaning jar rims to ensure a good seal.
Mason jars: Wide-mouth quart-size jars are ideal, but pint-size or half-pint jars can also be used.
New lids and bands: Ensure they are clean and ready for use.
4
Pressure canner: Required for safely canning meat and low-acid vegetables.
5
Ingredients for Canning Beef Stew
This recipe is wonderfully flexible. You can adjust the quantities to suit your taste and the size of your jars.
6
Here are the basic ingredients:
Stew beef (or substitute with venison, or chicken)
Potatoes: Peeled and chopped.
Onions: Peeled and chopped.
Carrots: Peeled and chopped.
Salt: Use any good quality salt. Note that salts with minerals might make the broth cloudy, but this is normal and safe.
7
Step-by-Step Canning Process
Step 1: Prepare Your Jars and Canner
Clean your jars with hot, soapy water and keep them warm. Prepare your lids and bands similarly. Add about two inches of water to your pressure canner and start warming it up slowly.
Step 2: Fill the Jars
Start by filling your jars with meat, followed by potatoes, carrots, and onions. Ensure you leave about one inch of headspace at the top of each jar. Add a teaspoon of salt per quart-sized jar. You can also add other dry herbs and spices at this stage.
8
Step 3: Add Liquid and Remove Bubbles
Pour hot water or broth into the jars, covering the ingredients while maintaining the one-inch headspace. Use the bubble remover tool to release any trapped air.
Step 4: Clean and Seal the Jars
Clean the rims of the jars with white vinegar and a clean cloth to ensure a proper seal. Place the lids on the jars and screw on the bands until they are finger-tight.
Step 5: Load the Canner
Place the jars in the pressure canner on a rack to prevent direct contact with the bottom. Ensure the water level is correct, then secure the canner lid.
9
Step 6: Vent and Pressurize
Heat the canner until it starts steaming. Let it vent for 10 minutes, then place the weight on the vent. Bring the canner up to the appropriate pressure for your altitude (15 pounds for most areas).
Step 7: Process the Jars
Once the canner reaches the desired pressure, process the jars for 90 minutes. Maintain a steady pressure throughout the process.
Step 8: Cool the Canner
Turn off the heat and allow the canner to cool naturally until it reaches zero pressure. Do not rush this step as it can affect the final seal.
Step 9: Remove and Check the Jars
Carefully remove the jars from the canner and place them on a towel, leaving space between them. Let them cool for 16-18 hours. Check the seals by pressing the center of each lid. If it does not pop back, the jar is sealed.
Step 10: Store Your Stew
Label your jars with the contents and date. Store them in a cool, dark place. Your canned beef stew is now ready to enjoy!
Enjoy Your Homemade Beef Stew
When you’re ready to eat, simply open a jar, heat the stew, and serve it over noodles, rice, or with a side of bread and salad. It’s a hearty, delicious meal that’s ready in minutes. Happy canning!
Leave a Review
Please log in or register for a new account in order to leave a review.