Creative Canning: Transforming Your Garden Harvest into Delicious Gifts

hot peppers
water
garlic
peppers
1
Canning is a simple and rewarding way to make the most out of your garden's bounty. It's a creative process that allows you to preserve the flavors of the season and even create unique gifts for friends and family. Here's a step-by-step guide on how to can peppers, perfect for those looking to try their hand at this timeless preservation method.
Why Canning?
Canning is an excellent method to preserve the fresh produce from your garden. Whether you have an abundance of cayenne peppers, tomatoes, or other vegetables, canning allows you to enjoy these flavors year-round. Plus, homemade canned goods make wonderful and thoughtful gifts, especially during the holiday season.
Preparing Your Jars
Before you start canning, it's crucial to prepare your jars properly:
Wash the Jars: Thoroughly clean your canning jars with hot, soapy water. Rinse and drain them well.
Inspect for Damage: Check each jar for cracks or nicks, discarding any damaged ones to prevent breakage during the canning process.
Heat the Jars: Place a rack in the bottom of your boiling water canner to keep jars off the bottom. Fill each jar about 2/3 full of water, and fill the canner until it's about 2/3 full as well. Cover and bring to a simmer, heating for at least 10 minutes.

2
Heat the Lids: In a small saucepan, heat the lids to around 180°F. This step is essential for ensuring a proper seal. Note that you don't need to heat the screw bands.
Canning Peppers
For this recipe, we'll use a mix of cayenne peppers, sweet banana peppers, and hot cherry peppers.
Ingredients:
3 types of peppers: cayenne, sweet banana, and hot cherry
6 cups vinegar
2 cups water
3 garlic cloves, coarsely crushed
Instructions:
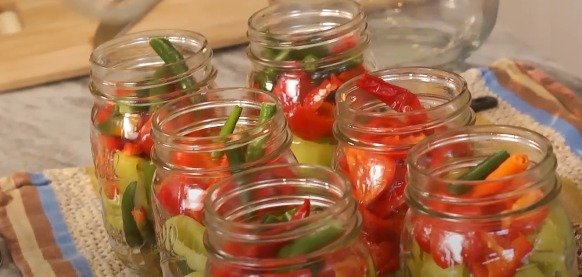
Chop the Peppers: Coarsely chop your peppers and pack them into clean, hot jars. Leave about half an inch of space at the top.
Prepare the Vinegar Solution: Combine 6 cups of vinegar, 2 cups of water, and 3 crushed garlic cloves in a pot. Bring the mixture to a boil to infuse the vinegar with garlic flavor.
Fill the Jars: Pour the hot vinegar solution over the peppers, covering them completely.

3
Seal the Jars: Place the lids on top of the jars and screw the bands on until they are just snug, not too tight.
Water Bath Processing
Return the Jars to the Canner: Place the filled jars back into the boiling water canner. Ensure there is about an inch of water covering the tops of the jars.
Boil: Bring the water to a boil and process the jars for 10 minutes.
Cool Slowly: After boiling, remove the jars and let them cool slowly. Place them on a tea towel and cover with another tea towel to insulate and slow the cooling process. Allow them to sit undisturbed for 24 hours.
Checking the Seal
After 24 hours, check the seal by removing the screw bands and lifting the jars slightly by the lid. If the lid holds firm, your seal is good.
4
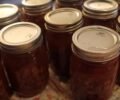
Enjoy or Gift
Once sealed properly, your canned peppers are ready to enjoy or to give as delightful homemade gifts. Your friends and family will surely appreciate the effort and love put into these preserved treats.
Final Thoughts
Canning is not just a preservation method; it's a way to get creative with your garden produce and share the flavors of the season with loved ones. So, gather your jars and peppers, and start canning today!
Ingredients
hot peppers
water
garlic
peppers
Directions
1
Canning is a simple and rewarding way to make the most out of your garden's bounty. It's a creative process that allows you to preserve the flavors of the season and even create unique gifts for friends and family. Here's a step-by-step guide on how to can peppers, perfect for those looking to try their hand at this timeless preservation method.
Why Canning?
Canning is an excellent method to preserve the fresh produce from your garden. Whether you have an abundance of cayenne peppers, tomatoes, or other vegetables, canning allows you to enjoy these flavors year-round. Plus, homemade canned goods make wonderful and thoughtful gifts, especially during the holiday season.
Preparing Your Jars
Before you start canning, it's crucial to prepare your jars properly:
Wash the Jars: Thoroughly clean your canning jars with hot, soapy water. Rinse and drain them well.
Inspect for Damage: Check each jar for cracks or nicks, discarding any damaged ones to prevent breakage during the canning process.
Heat the Jars: Place a rack in the bottom of your boiling water canner to keep jars off the bottom. Fill each jar about 2/3 full of water, and fill the canner until it's about 2/3 full as well. Cover and bring to a simmer, heating for at least 10 minutes.
2
Heat the Lids: In a small saucepan, heat the lids to around 180°F. This step is essential for ensuring a proper seal. Note that you don't need to heat the screw bands.
Canning Peppers
For this recipe, we'll use a mix of cayenne peppers, sweet banana peppers, and hot cherry peppers.
Ingredients:
3 types of peppers: cayenne, sweet banana, and hot cherry
6 cups vinegar
2 cups water
3 garlic cloves, coarsely crushed
Instructions:
Chop the Peppers: Coarsely chop your peppers and pack them into clean, hot jars. Leave about half an inch of space at the top.
Prepare the Vinegar Solution: Combine 6 cups of vinegar, 2 cups of water, and 3 crushed garlic cloves in a pot. Bring the mixture to a boil to infuse the vinegar with garlic flavor.
Fill the Jars: Pour the hot vinegar solution over the peppers, covering them completely.
3
Seal the Jars: Place the lids on top of the jars and screw the bands on until they are just snug, not too tight.
Water Bath Processing
Return the Jars to the Canner: Place the filled jars back into the boiling water canner. Ensure there is about an inch of water covering the tops of the jars.
Boil: Bring the water to a boil and process the jars for 10 minutes.
Cool Slowly: After boiling, remove the jars and let them cool slowly. Place them on a tea towel and cover with another tea towel to insulate and slow the cooling process. Allow them to sit undisturbed for 24 hours.
Checking the Seal
After 24 hours, check the seal by removing the screw bands and lifting the jars slightly by the lid. If the lid holds firm, your seal is good.
4
Enjoy or Gift
Once sealed properly, your canned peppers are ready to enjoy or to give as delightful homemade gifts. Your friends and family will surely appreciate the effort and love put into these preserved treats.
Final Thoughts
Canning is not just a preservation method; it's a way to get creative with your garden produce and share the flavors of the season with loved ones. So, gather your jars and peppers, and start canning today!
Leave a Review
Please log in or register for a new account in order to leave a review.