
How to Clarify and Can Butter: A Step-by-Step Guide

16 lbs unsalted butter
1
Hello, Many of you have asked about my process for clarifying and canning butter. Today, I'll walk you through my method, which I believe is more precise than the typical approach. Let's dive in!
Why Unsalted Butter?
I prefer using unsalted butter because salted butter tends to recrystallize and harden, leading to a grainy texture. Unsalted butter avoids this issue and results in a smoother product.
Step-by-Step Process
Melting the Butter
Start with 16 pounds of unsalted butter. I buy mine from Sam's Club, and given the rising prices, it's better to buy now than wait for a sale.
Place the butter in a pot and set it on medium heat. As it melts, bring it to a boil to start the clarifying process.
Boiling and Breaking
Maintain the heat to keep the butter just past the boiling point. If it starts to boil over, lift the pot for a few seconds to calm it down.
Once the foam subsides and you can see the yellow butter below, the "breaking" point is reached. This usually happens after about five minutes of boiling on low heat.

2
Skimming the Impurities
During the cooking process, impurities will rise to the top. Use a whisk to help break up clumps if they aren't forming properly.
Skim off the solids from the top with a spoon, being careful not to disturb the clarified butter underneath.
Cooking to Clarity
Continue cooking the butter on low heat for about 30 minutes. Stir occasionally, but avoid scraping the bottom, where impurities settle.
After about an hour to an hour and a half, depending on the amount, the butter should be clear.

3
Canning Process
Preheat your jars in the oven at 200°F for 30 minutes. This ensures they are sterilized and ready for the hot butter.
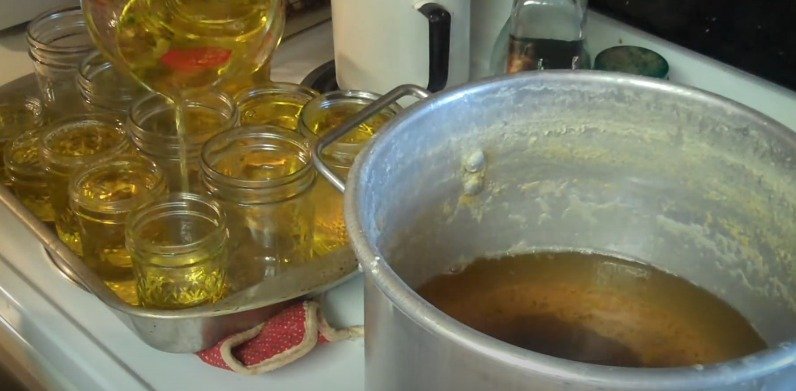
Pour the clarified butter into the jars, leaving about a quarter-inch space at the top. Be careful not to scrape the bottom of the pot as you pour.
Wipe the rims of the jars clean to ensure a good seal.
4
Sealing the Jars
Place the lids on the jars and screw the bands on just until resistance is met. Using a potholder, tighten the bands securely.
Turn the jars upside down to keep the rings hot and ensure a good seal. Let them cool naturally without shaking.

5
Final Tips
The impurities left over can still be used in cooking, so don't throw them away.
Once cooled, the butter in the jars will solidify nicely and can be stored for up to two years.
Always handle hot jars and butter with care to avoid burns.
This method results in beautifully clarified butter that spreads easily and tastes delicious. Give it a try and enjoy the benefits of homemade clarified butter in your cooking!

Ingredients
16 lbs unsalted butter
Directions
1
Hello, Many of you have asked about my process for clarifying and canning butter. Today, I'll walk you through my method, which I believe is more precise than the typical approach. Let's dive in!
Why Unsalted Butter?
I prefer using unsalted butter because salted butter tends to recrystallize and harden, leading to a grainy texture. Unsalted butter avoids this issue and results in a smoother product.
Step-by-Step Process
Melting the Butter
Start with 16 pounds of unsalted butter. I buy mine from Sam's Club, and given the rising prices, it's better to buy now than wait for a sale.
Place the butter in a pot and set it on medium heat. As it melts, bring it to a boil to start the clarifying process.
Boiling and Breaking
Maintain the heat to keep the butter just past the boiling point. If it starts to boil over, lift the pot for a few seconds to calm it down.
Once the foam subsides and you can see the yellow butter below, the "breaking" point is reached. This usually happens after about five minutes of boiling on low heat.
2
Skimming the Impurities
During the cooking process, impurities will rise to the top. Use a whisk to help break up clumps if they aren't forming properly.
Skim off the solids from the top with a spoon, being careful not to disturb the clarified butter underneath.
Cooking to Clarity
Continue cooking the butter on low heat for about 30 minutes. Stir occasionally, but avoid scraping the bottom, where impurities settle.
After about an hour to an hour and a half, depending on the amount, the butter should be clear.
3
Canning Process
Preheat your jars in the oven at 200°F for 30 minutes. This ensures they are sterilized and ready for the hot butter.
Pour the clarified butter into the jars, leaving about a quarter-inch space at the top. Be careful not to scrape the bottom of the pot as you pour.
Wipe the rims of the jars clean to ensure a good seal.
4
Sealing the Jars
Place the lids on the jars and screw the bands on just until resistance is met. Using a potholder, tighten the bands securely.
Turn the jars upside down to keep the rings hot and ensure a good seal. Let them cool naturally without shaking.
5
Final Tips
The impurities left over can still be used in cooking, so don't throw them away.
Once cooled, the butter in the jars will solidify nicely and can be stored for up to two years.
Always handle hot jars and butter with care to avoid burns.
This method results in beautifully clarified butter that spreads easily and tastes delicious. Give it a try and enjoy the benefits of homemade clarified butter in your cooking!
Leave a Review
Please log in or register for a new account in order to leave a review.


