How to Make and Can Restaurant-Style Salsa: A Step-by-Step Guide

tomatoes
bell peppers
spanish onions
garlic
salt
vinegar
1
Welcome to Great Lakes Prepping! Summer is here, and for me, that means it's salsa season.
2
Many of you enjoyed my previous video on making and canning chunky garden salsa. Today,

3
I'll guide you through creating a smooth, restaurant-style salsa, perfect for canning and enjoying year-round.

4
Ingredients
To start, you'll need:
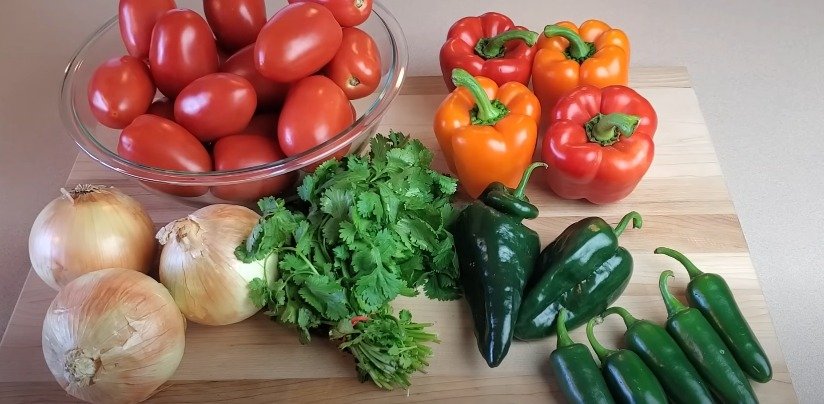
18 Roma tomatoes
Bell peppers (red or orange for vibrant color)
Spanish onions
Jalapenos and poblano peppers for a medium heat level
Fresh garlic cloves
Fresh cilantro
Kosher salt
White vinegar
Citric acid or lemon juice (for added acidity)

5
Preparing the Tomatoes
Blanching the Tomatoes: Begin by boiling water to blanch the tomatoes. Cut off the ends of the tomatoes and drop them into the boiling water for about five minutes. This process helps to loosen the skins.

6
Ice Bath: Transfer the tomatoes to an ice bath immediately to stop the cooking process. The skins should peel off easily.

7
Chopping: Coarsely chop the peeled tomatoes. This helps them break down and release more liquid during cooking.

8
Preparing the Vegetables
Bell Peppers: Roughly chop your bell peppers. For a smooth salsa, avoid using green peppers as they can affect the color.

9
Onions: Use Spanish onions for a robust flavor. Roughly chop them, as they will blend well in the cooking process.

10
Hot Peppers: Slice the jalapenos and poblanos. Adjust the quantity to achieve your desired spice level. Remember to wear gloves to avoid irritation.

11
Garlic and Cilantro: Coarsely chop the garlic and cilantro. Fresh cilantro is recommended for the best flavor.
Cooking the Salsa
stockpot, combine the tomatoes, bell peppers, onions, jalapenos, poblanos, garlic, and cilantro.
Simmer: Cook the mixture until the vegetables are soft and the flavors meld together, about 25 minutes. Stir occasionally.

12
Blending: Use an immersion blender to blend the salsa to your desired consistency. If you don't have an immersion blender, carefully transfer the hot mixture to a countertop blender.

13
Seasoning: Add two tablespoons of kosher salt and one cup of white vinegar. Blend again if necessary.
Reducing the Salsa
Simmer: Continue to simmer the salsa to reduce its liquid content. This can take up to an hour, depending on the batch size.
Adjust Consistency: Aim for a thicker consistency, similar to store-bought salsa.

14
Canning the Salsa
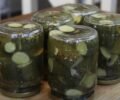
Sterilize Jars: Boil your canning jars in a water bath canner to sterilize them. Simmer the lids in hot water (not boiling) to soften the seals.
Fill Jars: Add 1/8 teaspoon of citric acid to each pint jar. Using a funnel, fill the jars with salsa, leaving about 1/2 inch of headspace.
Remove Air Bubbles: Use a de-bubbling tool to eliminate any trapped air bubbles.

15
Clean Jar Rims: Wipe the rims of the jars with a damp paper towel to ensure a good seal.
Seal Jars: Place the lids on the jars and screw on the rings until they are fingertip tight.
Processing the Salsa
Water Bath: Place the jars in the water bath canner, ensuring at least an inch of water covers them. Bring to a full rolling boil and process for 15 minutes.
Cooling: After processing, let the jars cool in the canner for a few minutes before removing them to avoid a sudden temperature change that could break the jars.
Check Seals: Once cooled, check that each lid has sealed properly. If any jars did not seal, refrigerate and use them within a couple of weeks.
Enjoy your homemade restaurant-style salsa all year long! This method ensures you have delicious, fresh salsa ready for any occasion.
Happy canning!

Ingredients
tomatoes
bell peppers
spanish onions
garlic
salt
vinegar
Directions
1
Welcome to Great Lakes Prepping! Summer is here, and for me, that means it's salsa season.
2
Many of you enjoyed my previous video on making and canning chunky garden salsa. Today,
3
I'll guide you through creating a smooth, restaurant-style salsa, perfect for canning and enjoying year-round.
4
Ingredients
To start, you'll need:
18 Roma tomatoes
Bell peppers (red or orange for vibrant color)
Spanish onions
Jalapenos and poblano peppers for a medium heat level
Fresh garlic cloves
Fresh cilantro
Kosher salt
White vinegar
Citric acid or lemon juice (for added acidity)
5
Preparing the Tomatoes
Blanching the Tomatoes: Begin by boiling water to blanch the tomatoes. Cut off the ends of the tomatoes and drop them into the boiling water for about five minutes. This process helps to loosen the skins.
6
Ice Bath: Transfer the tomatoes to an ice bath immediately to stop the cooking process. The skins should peel off easily.
7
Chopping: Coarsely chop the peeled tomatoes. This helps them break down and release more liquid during cooking.
8
Preparing the Vegetables
Bell Peppers: Roughly chop your bell peppers. For a smooth salsa, avoid using green peppers as they can affect the color.
9
Onions: Use Spanish onions for a robust flavor. Roughly chop them, as they will blend well in the cooking process.
10
Hot Peppers: Slice the jalapenos and poblanos. Adjust the quantity to achieve your desired spice level. Remember to wear gloves to avoid irritation.
11
Garlic and Cilantro: Coarsely chop the garlic and cilantro. Fresh cilantro is recommended for the best flavor.
Cooking the Salsa
stockpot, combine the tomatoes, bell peppers, onions, jalapenos, poblanos, garlic, and cilantro.
Simmer: Cook the mixture until the vegetables are soft and the flavors meld together, about 25 minutes. Stir occasionally.
12
Blending: Use an immersion blender to blend the salsa to your desired consistency. If you don't have an immersion blender, carefully transfer the hot mixture to a countertop blender.
13
Seasoning: Add two tablespoons of kosher salt and one cup of white vinegar. Blend again if necessary.
Reducing the Salsa
Simmer: Continue to simmer the salsa to reduce its liquid content. This can take up to an hour, depending on the batch size.
Adjust Consistency: Aim for a thicker consistency, similar to store-bought salsa.
14
Canning the Salsa
Sterilize Jars: Boil your canning jars in a water bath canner to sterilize them. Simmer the lids in hot water (not boiling) to soften the seals.
Fill Jars: Add 1/8 teaspoon of citric acid to each pint jar. Using a funnel, fill the jars with salsa, leaving about 1/2 inch of headspace.
Remove Air Bubbles: Use a de-bubbling tool to eliminate any trapped air bubbles.
15
Clean Jar Rims: Wipe the rims of the jars with a damp paper towel to ensure a good seal.
Seal Jars: Place the lids on the jars and screw on the rings until they are fingertip tight.
Processing the Salsa
Water Bath: Place the jars in the water bath canner, ensuring at least an inch of water covers them. Bring to a full rolling boil and process for 15 minutes.
Cooling: After processing, let the jars cool in the canner for a few minutes before removing them to avoid a sudden temperature change that could break the jars.
Check Seals: Once cooled, check that each lid has sealed properly. If any jars did not seal, refrigerate and use them within a couple of weeks.
Enjoy your homemade restaurant-style salsa all year long! This method ensures you have delicious, fresh salsa ready for any occasion.
Happy canning!
Leave a Review
Please log in or register for a new account in order to leave a review.